

![]()
In the realm of modern maker technology, few components have reshaped the landscape of DIY electronics as profoundly as the NeoPixel. Since its introduction by Adafruit Industries, the addressable RGB LED has become a staple for hobbyists and professionals alike, blending the simplicity of a standard LED with the sophistication of individual pixel-level control. By integrating a WS2811 or WS2812 driver directly into the LED package, these components allow for intricate, vibrant, and highly customizable lighting installations.
However, moving beyond simple, hard-coded animations—often restricted by USB tethers or static microcontroller sketches—remains a hurdle for many. This article explores a sophisticated architecture for managing decentralized NeoPixel installations via Wi-Fi. By utilizing the Fishino Guppy and NodeMCU boards in tandem with a custom Python-based controller, users can orchestrate complex light shows across multiple devices from a single PC or a low-power Raspberry Pi.
Main Facts: The Evolution of Addressable Lighting
The core appeal of the NeoPixel lies in its "smart" architecture. Unlike traditional LEDs that require separate drivers and complex wiring, each NeoPixel contains an RGB SMD 5050 chip coupled with an integrated control IC. This allows for the chaining of hundreds of LEDs while maintaining control over the color and brightness of every individual pixel in the string.
Traditionally, controlling these arrays required a dedicated microcontroller—typically an Arduino—to pump out precise data signals. While effective for localized projects, this setup creates a bottleneck: changing an animation sequence usually necessitates re-flashing the microcontroller’s firmware, a tedious process that becomes impractical when dealing with multiple installations distributed throughout a home.

The system presented here solves this by decoupling the "intelligence" (the animation logic) from the "hardware" (the LED drivers). By leveraging the ESP8266-based Wi-Fi capabilities of the Fishino Guppy and NodeMCU, the microcontrollers act as "dumb" network endpoints that wait for UDP packets containing color data, allowing the central controller to push real-time animations wirelessly.
Chronology of Development
The transition from wired, static lighting to the networked, dynamic system described here follows a clear technological progression:
- The NeoPixel Standard: The initial phase focused on the adoption of the WS2812B protocol, where the timing-sensitive nature of the data signal was established as the primary challenge for long-distance wiring.
- Network Integration: The advent of the ESP8266 chip changed the paradigm. By providing affordable, integrated Wi-Fi, it allowed microcontrollers to connect to local area networks (LANs).
- Protocol Selection: The move from TCP to UDP (User Datagram Protocol) was a pivotal development. UDP’s low-overhead, high-speed nature allows for the rapid transmission of large arrays of RGB data, which is essential for smooth animation playback.
- Library Development: The creation of the "NeoPy" Python library simplified the interface. By abstracting the complex networking code into simple methods like
Set()andShow(), the project shifted from an engineering challenge to a creative programming exercise. - Automation Layer: The final phase involved utilizing the Linux
crontabutility on a Raspberry Pi, enabling the system to act autonomously based on a pre-programmed schedule.
Supporting Data and Technical Requirements
Implementing this distributed system requires careful attention to power distribution and logic levels.
Power Budgeting
A critical factor often overlooked by beginners is power consumption. A single NeoPixel at full white brightness can draw approximately 60mA. A 5-meter strip containing 150 LEDs, therefore, requires a 9-amp power supply. Providing insufficient current can lead to voltage drops, causing flickering or color distortion at the end of the strip.

Component List
To replicate this setup, the following hardware is essential:
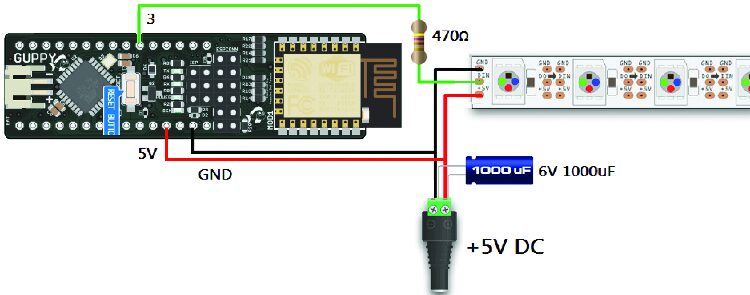
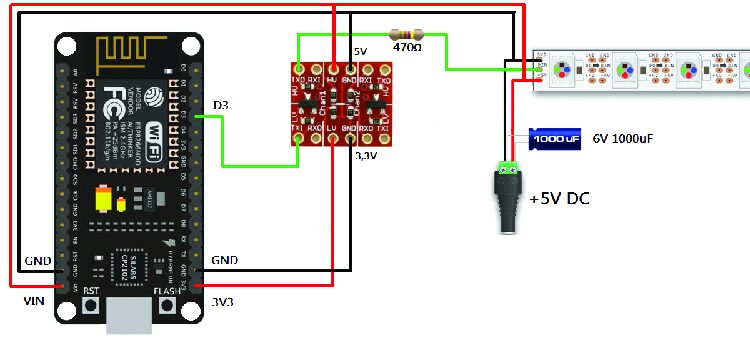
- Microcontrollers: Fishino Guppy and NodeMCU (ESP8266-based).
- Lighting: 5-meter NeoPixel strip (WS2812B) and a 56-LED NeoPixel Christmas star.
- Power: 5V DC power supply capable of handling the calculated amperage.
- Signal Integrity: 470-ohm resistors (for data line impedance matching) and 1,000µF capacitors (to smooth power supply spikes).
- Logic Level Shifting: A 3.3V to 5V converter (crucial for NodeMCU, which operates on 3.3V logic, to reliably trigger the 5V LEDs).
The Role of UDP
UDP was selected specifically for its efficiency. Unlike TCP, which confirms every packet receipt, UDP "fires and forgets." While this risks minor packet loss, the speed gain is critical for real-time lighting. Even if a few packets are lost, the human eye often fails to notice a frame drop in a fast-moving light animation.
Official Guidelines for Implementation
Preparing the Development Environment
Before deploying the code, the Arduino IDE must be configured to recognize the ESP8266 boards. For the NodeMCU, the board manager URL http://arduino.esp8266.com/stable/package_esp8266com_index.json must be added. Once the boards are installed, the Adafruit NeoPixel library acts as the foundation for the firmware.
The Firmware Architecture
The provided sketches for both the Fishino and NodeMCU follow a uniform logic:
- Initialization: Establish a Wi-Fi connection in
STATION_MODE. - Server Setup: Open a UDP port (e.g., 4242) to begin listening for incoming data.
- Data Processing: In the
loop(), the code checks for packets exactly three times the length of the number of LEDs (R, G, and B for every pixel). - Hardware Update: Once the packet is validated, the
strip.setPixelColor()andstrip.show()functions render the incoming frame.
Implications: The Future of Smart Home Lighting
The shift toward a Raspberry Pi-controlled, network-distributed lighting system has significant implications for home automation and environmental design.
Energy Efficiency and Automation
By utilizing a Raspberry Pi as the central hub, users replace the need for multiple active PCs. The Raspberry Pi is a low-power, "always-on" device, making it the ideal candidate for scheduling. Using crontab, users can schedule specific light sequences—such as a warm, dim light at sunset, or a "presence simulation" mode while away on vacation.
Scalability
The "NeoPy" object-oriented approach means that scaling the system is trivial. Adding a new room to the lighting network requires only the addition of a new IP address in the Python script. Because the controller handles all the heavy lifting, the client boards remain inexpensive and simple to install.
Creative Versatility
This architecture allows for more than just simple colors. Since Python is a fully functional programming language, the system can be integrated with external data sources. For example, a user could write a script that changes the color of the bedroom LED strip based on the local weather forecast, or pulses the living room star in response to specific system notifications.
Security and Network Considerations
While UDP is fast, it is unencrypted. Users should ensure these devices are hosted on a secure, private Wi-Fi network. Furthermore, the use of static IP addresses—as demonstrated in the sketches—is highly recommended to ensure the central controller consistently finds the light installations upon rebooting.
Final Thoughts
This project represents the convergence of high-level software abstraction and low-level hardware control. By treating LEDs as network objects, we transform static lighting into a dynamic, reactive environment. Whether for holiday decoration, architectural accenting, or functional home automation, the combination of Python, ESP8266, and NeoPixel technology provides a robust, professional-grade platform for the modern home. The transition from manual control to automated, scheduled, and network-aware lighting is no longer an expensive industrial endeavor; it is now a manageable reality for every maker.