

Introduction
In the fast-paced world of software development, the ability to manage testing lifecycles efficiently is the cornerstone of high-quality releases. Building upon the foundational knowledge of installation, test plan creation, and basic test case authoring covered in the first part of this series, this article delves into the sophisticated features of TestLink. As a leading open-source test management tool, TestLink offers a robust framework for teams to align their quality assurance efforts with project requirements, streamline execution, and maintain detailed documentation through automated reporting.

This guide provides a deep dive into user role management, the integration of requirements, the intricacies of test execution, and the portability of test assets across different server environments.

The Core Architecture of TestLink: User Management and Role-Based Access
Security and collaboration are paramount in enterprise testing environments. TestLink employs a granular permission system that restricts or grants access based on defined user roles. By default, TestLink comes pre-configured with standard roles, but for complex organizational structures, administrators can create custom roles with tailored permissions.

The Mechanism of User Administration
Maintaining an organized testing team requires a systematic approach to user management. To configure your workspace:

- Access Control: Navigate to the "Users/Roles" link in the main navigation bar. This central hub allows for the creation of new accounts and the modification of existing permissions.
- Creation: By clicking the "Create" button, administrators can input essential user details, including credentials and contact information.
- Role Assignment: The "Assign Test Project Roles" tab is critical. Here, administrators map specific users to specific projects, ensuring that testers only interact with the data pertinent to their scope of work.
- Test Plan Granularity: Beyond project-level access, TestLink allows for "Assign Test Plan Roles," which provides even tighter control, restricting or allowing specific actions on a per-test-plan basis.
This structured approach ensures that stakeholders, such as developers, QA leads, and manual testers, have exactly the access required to perform their duties without risking the integrity of the broader test repository.

Aligning Quality with Strategy: Requirements Management
A software requirement is more than a document; it is a promise of functionality. TestLink enables teams to bridge the gap between business needs and testing validation by allowing users to define requirements directly within the tool.

Defining and Linking Requirements
Requirements management is essential for calculating test coverage. By defining requirements in TestLink, teams can ensure that every feature of the software has a corresponding test case.

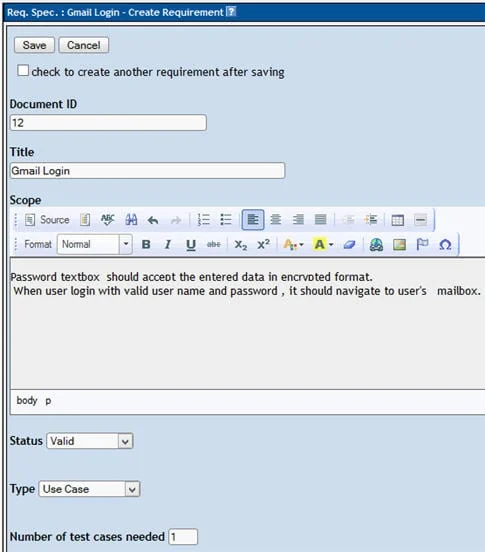
- Establishing the Requirement: Under the "Requirements" tab, users can generate a hierarchy of needs by inputting a Document ID, a descriptive Title, and a comprehensive Description. Once saved, these requirements appear in the left-hand panel, creating a clear roadmap for the testing team.
- The Power of Traceability: The most potent feature of this module is the ability to link requirements to specific test cases. By opening a test case within the "Test Specification" module and selecting the "Requirements" icon, a tester can assign a requirement to that case.
- Implications for Coverage: This linkage allows for real-time reporting on test coverage. If a specific requirement lacks associated test cases, the report will highlight this gap, allowing managers to direct resources toward writing additional test suites to ensure maximum product safety and performance.
Executing Test Cases: Precision and Documentation
Test execution is the phase where theory meets reality. TestLink facilitates this by providing a clean interface for executing test cases and logging the outcomes of each step.

The Execution Lifecycle
Once a test plan is active, testers can transition to the "Test Execution" panel. The workflow is designed for speed and accuracy:

- Selection: Navigate to the relevant test case within the left-side tree structure.
- Status Updates: Testers can mark cases as "Passed," "Failed," or "Blocked." It is important to note that once a test case has been moved from the initial "Not Run" state, its history becomes part of the audit trail.
- Contextual Logging: The system allows for the inclusion of execution notes. These are vital for developers to understand the context of a failure—such as specific environment variables or unexpected error messages—thereby accelerating the debugging process.
- Finalization: Clicking "Save Execution" commits the result to the database, instantly updating the project metrics.
Analytical Insights: Generating Test Reports
Evidence-based decision-making is only possible with clear, actionable data. TestLink’s built-in reporting engine is a powerful tool for stakeholders.

Reporting Formats and Utility
TestLink supports the export of data into multiple formats, including HTML, MS Word, MS Excel, OpenOffice Writer, and Calc. The process is straightforward:

- Selection: Navigate to "Test Reports" and select the desired report type from the sidebar.
- Customization: Users can toggle various checkboxes to include or exclude specific data points, such as test case details, execution notes, or requirement coverage.
- Execution: After selecting the project folder structure, the tool generates a comprehensive report that can be shared with management or used for compliance audits.
These reports serve as the definitive record of the testing phase, providing the necessary evidence for release sign-offs.

Asset Portability: Exporting and Importing Test Suites
One of the most common challenges in enterprise testing is migrating data between servers. Whether moving from a sandbox environment to production or consolidating test suites across distributed teams, TestLink’s export/import feature is an invaluable time-saver.

The Mechanics of Migration
- Exporting: By selecting a test case or entire suite and utilizing the "Export" function within the settings menu, users can generate an XML file. This file contains the entirety of the test definition, ensuring that no data is lost during the transfer.
- Importing: Importing is equally efficient. By selecting the target folder and choosing "Import" from the operations menu, users can upload the XML file. The system automatically populates the repository with the imported test cases, preserving their original structure and metadata.
This capability eliminates the need for manual recreation of test suites, reducing human error and significantly cutting down the administrative overhead involved in managing large-scale testing repositories.

Conclusion and Future Outlook
This tutorial has demonstrated that TestLink is far more than a simple repository for test cases; it is a comprehensive management ecosystem. By effectively utilizing role-based access, rigorous requirement mapping, disciplined test execution, and efficient data migration, testing teams can significantly improve their operational maturity.

While manual execution remains the primary focus of this guide, it is essential to look toward the future. The modern QA landscape increasingly demands integration with automated workflows. TestLink provides an API that allows for the remote updating of execution statuses. In the final installment of this series, we will bridge the gap between manual management and modern automation by exploring how to update test execution statuses remotely using Selenium WebDriver in conjunction with the TestLink API.

Automating these repetitive tasks is the final step in transforming your testing department from a bottleneck into a catalyst for high-speed, high-quality software delivery. Stay tuned as we conclude this series by bringing automation to the forefront of your test management strategy.