Mastering TestLink: Advanced Test Management, Execution, and Migration Strategies (Part 2)
Introduction
As software engineering practices evolve, the need for robust, transparent, and scalable quality assurance (QA) frameworks has never been more critical. In the continuous lifecycle of software development, managing test artifacts effectively dictates the difference between a seamless product deployment and a catastrophic production failure.

Building upon the foundational principles introduced in Part 1 of the "Learning TestLink Test Management Tool" series—which covered initial system installation, test plan creation, and foundational test case authoring—this second installment delves into the platform’s advanced orchestration capabilities. Here, we examine the mechanics of requirements management, user permissions governance, dynamic test execution workflows, comprehensive reporting architectures, and seamless project migration via XML integration.

By mastering these core features, QA teams can bridge the gap between product requirements and test execution coverage, ensuring total traceability and heightened software reliability.

User Governance and Role-Based Access Control (RBAC)
In enterprise software testing environments, restricting access rights based on user roles is paramount for maintaining data integrity, security, and clear accountability. TestLink implements a structured Role-Based Access Control (RBAC) mechanism that governs who can read, write, execute, or manage test artifacts across different projects and test plans.

Default and Custom Roles
TestLink comes pre-configured with standard user roles tailored to common QA ecosystem participants, such as testers, senior QA leads, guest observers, and administrators. However, organizations frequently require granular adjustments to these permissions to align with unique internal workflows.

Administrators can construct custom roles with bespoke permissions, limiting or expanding access to sensitive areas like test specification modifications or test plan configurations.

Step-by-Step Guide: Creating Users and Assigning Roles
Implementing access control within TestLink involves a straightforward administrative workflow:

- Accessing the User Management Portal: Navigate to the top navigation bar and select the Users/Roles link to open the administrative user management interface.
- Initiating User Creation: Click on the Create button located on the users page.
- Entering User Credentials: Fill out the user profile form with the required username, contact details, initial password, and designate the overarching system role. Click Save to commit the record.
- Assigning Test Project Roles: To grant a user access to a specific testing initiative, switch to the Assign Test Project Roles tab.
- Mapping Projects and Permissions: Select the target project name and the appropriate role from the corresponding dropdown menus, then save the associations.
- Configuring Test Plan Roles: Similarly, administrators can switch to the Assign Test Plan Roles tab to fine-tune access rights for individual test cycles.
Requirements Management: Bridging the Gap Between Design and Testing
A requirement defines a specific functional or non-functional constraint and operational need that the target software must satisfy. Effective testing is fundamentally rooted in requirements verification; if a test suite does not map back to core product requirements, development teams run the risk of over-testing trivial features while missing critical business logic.

Defining and Documenting Requirements
TestLink allows teams to maintain centralized requirement repositories directly within the tool.

- Navigating to Requirements: Select the Requirements link on the main navigation bar to access the requirement specification dashboard.
- Creating a Document Specification: Click the Create button to initiate a new requirement document.
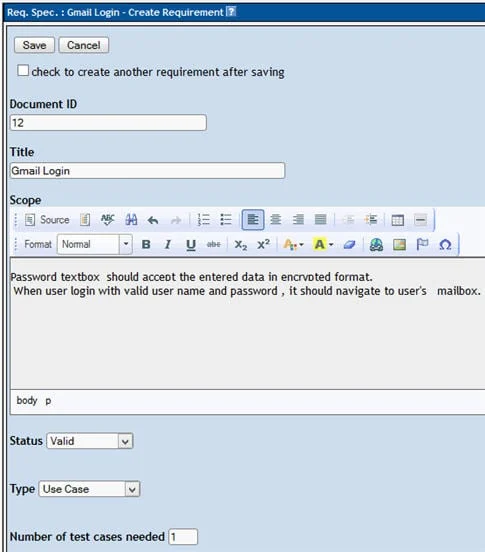
- Populating Metadata: Enter the Document ID, Title, and a comprehensive Description of the requirement specification, then click Save.
- Managing Requirement Operations: The newly created requirement specification will appear on the left-hand panel. Click on the corresponding Create button under Requirement Operations to add individual requirement items.
- Finalizing Entries: Input the specific requirement criteria and parameter details, followed by clicking Save.
Assigning Requirements to Test Cases
One of TestLink’s most powerful features is the ability to link requirements directly to individual test cases. This linkage provides real-time visibility into test coverage, highlighting unverified requirements so teams can expand their test suites accordingly.

- Step 1: Open a target test case from the Test Specification section.
- Step 2: Click on the Requirements icon embedded within the test case toolbar to open the requirement-linking dialog box.
- Step 3: Select the desired requirement specification from the dropdown menu and check the boxes next to the relevant requirements.
- Step 4: Click the Assign button. The selected requirements will now appear under the assigned requirements section, locking in traceability between the product spec and the QA validation suite.
Executing Test Cases and Recording Results
Test execution represents the active phase of quality assurance where human operators or automated runners validate code behavior against expected outcomes.

Execution States and Immutability
In TestLink, every test case resides in one of several execution states: Not Run, Passed, Failed, or Blocked.

- Initial State: Newly generated or newly assigned test cases default to the Not Run status.
- Immutability Rule: Once a test execution is updated to a terminal status (Passed, Failed, or Blocked), users cannot manually revert the status back to Not Run. This ensures strict audit trails and prevents accidental erasure of test history during active test cycles.
Step-by-Step Test Execution Workflow
- Navigating to Execution Panels: Click the Test Execution link on the main navigation bar to load the execution workspace.
- Selecting Test Cases: Locate and select the specific test case or test suite from the left-side hierarchical tree view.
- Evaluating and Documenting: Choose the appropriate execution status (Pass, Fail, or Blocked) and input detailed test execution notes—including error logs, environment parameters, or bug tracker references—into the comment block.
- Committing Results: Click the Save execution button. TestLink immediately logs the outcome, updating the historical record and adjusting the overall test run metrics for the active test plan.
Generating Comprehensive Test Reports
Test reports serve as objective evidence of product quality, readiness, and compliance. Stakeholders, project managers, and clients rely on these documents to make informed go/no-go deployment decisions.

TestLink features a robust reporting engine capable of exporting structured documentation across multiple industry-standard formats, including HTML, Microsoft Word, Microsoft Excel, OpenOffice Writer, and OpenOffice Calc.

Report Generation Procedure
- Accessing the Reporting Suite: Click on the Test Reports link in the navigation menu.
- Selecting Report Type: Choose the specific report template (e.g., General Test Report, Test Plan Report) from the left-side panel options.
- Customizing Content: Check the respective checkboxes to select the precise datasets, metrics, and summary tables to include in the output.
- Choosing File Formats: Adjust the output format by modifying the highlighted file-type dropdown selector.
- Executing Generation: Click on the target Test Project folder structure on the right-side panel to compile and render the final report.
Enterprise Portability: Exporting and Importing Test Suites
In dynamic software development environments, migrating test infrastructure between servers or replicating project structures across different TestLink instances is a frequent administrative requirement. Re-authoring complex test suites from scratch introduces administrative overhead and potential human error.

TestLink mitigates this through comprehensive XML-based export and import utilities.

Exporting Test Cases and Test Suites
- Selecting Artifacts: Navigate to the Test Specification page and select the test case or entire test suite folder you wish to export.
- Accessing Operations: Click the settings icon on the right-side panel to expose the array of test case operations.
- Initiating Export: Click the Export function.
- Configuring Parameters: Check all relevant configuration checkboxes and click the final Export button. TestLink packages the selected test structures into a standardized XML file and downloads it to your local storage drive.
Importing Test Cases and Test Suites
- Targeting Folders: Select the destination test suite folder within the project tree where the imported data should reside.
- Triggering Import Settings: Click the settings icon on the right-side panel to view available directory operations.
- Selecting Import: Click the Import button.
- Uploading Archives: Browse for and attach the previously exported XML file from your local drive, then click Upload file.
- Verification: The imported test cases and suites will parse successfully and populate the left-side hierarchical panel instantly.
Conclusion and Future Outlook
This comprehensive exploration of TestLink highlights its capacity as a mature, enterprise-grade test management tool. Beyond manual test execution and basic reporting, TestLink provides deep traceability via requirements management, granular security controls through RBAC, and operational flexibility via XML import/export utilities.

However, modern software delivery pipelines demand speed and continuous feedback loops, making manual test execution and status updates inefficient for large-scale operations. While manual verification remains essential for exploratory and user-acceptance testing, automating repetitive tasks is critical to maximizing engineering productivity.

In the upcoming third and final installment of this tutorial series, we will bridge the gap between manual management and modern automation. We will explore advanced integration concepts, specifically demonstrating how to programmatically update test case execution statuses remotely using Selenium WebDriver scripts coupled with the native TestLink Application Programming Interface (API).