Mastering TestLink: Advanced Test Management, Execution, and Migration Strategies (Part 2)
Introduction and Context
In the ever-evolving landscape of software engineering, maintaining rigorous quality assurance (QA) standards is paramount to delivering robust, scalable applications. Building upon the foundational elements covered in the first installment of the "Learning TestLink Test Management Tool" series—which focused on tool installation, test plan architecture, and initial test case creation—this second installment delves into the platform’s advanced operational capabilities.

As engineering teams scale, managing requirements traceability, role-based access control (RBAC), meticulous test execution, and comprehensive reporting becomes non-negotiable. TestLink, a leading open-source test management tool, provides these crucial functionalities out of the box. This report explores the core advanced features of TestLink, offering a step-by-step framework for implementation, data migration, and project administration.

User Management and Role-Based Access Control (RBAC) in TestLink
Enterprise software projects typically involve cross-functional teams comprising project managers, lead QA engineers, manual testers, and external stakeholders. To maintain security, data integrity, and accountability, TestLink enforces strict access rights determined by user roles.

Default and Custom Roles
TestLink comes equipped with several built-in default roles that dictate operational boundaries within a project. However, organizations frequently require granular permissions tailored to unique workflow requirements. Administrators can easily construct custom roles with bespoke permissions, balancing security with operational flexibility.

Step-by-Step Guide: Creating Users and Assigning Roles
- Access the User Administration Panel: Navigate to the top navigation bar and select the Users/Roles link to load the administrative interface.
- Initiate User Creation: Click the Create button located on the users page.
- Populate User Details: Enter the required credentials, including the username, personal details, and designated role within the form fields, then click Save.
- Assign Project-Specific Roles: Switch to the Assign Test Project Roles tab.
- Map Projects to Roles: Select the targeted Test Project and the corresponding user role from the respective drop-down menus.
By utilizing the Assign Test Plan Roles tab, administrators can further refine permissions, restricting user interaction to specific test plans within a broader project ecosystem.

Requirements Management and Traceability
In software development, a requirement represents a formal condition or capability that a system must satisfy to fulfill a contract, standard, or specification. Establishing a clear link between requirements and test cases is the cornerstone of effective QA governance, ensuring complete test coverage and preventing costly oversights.

Writing Requirements in TestLink
- Navigate to Requirements: Click on the Requirements link on the main navigation bar to access the requirements module.
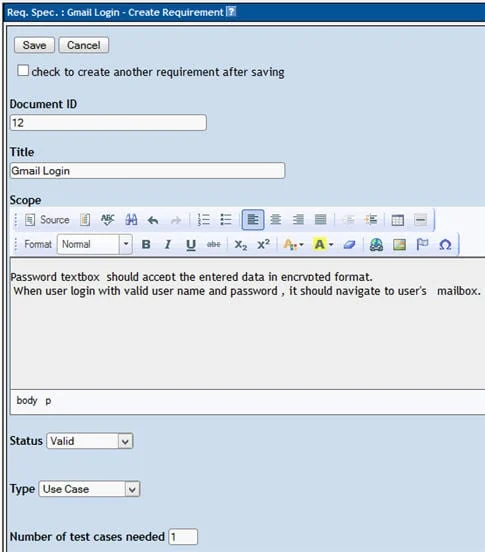
- Create a Requirement Document: Click the Create button.
- Define Document Parameters: Input the Document ID, Title, and a comprehensive Description of the requirement, then click Save.
- Establish Specifications: The newly created requirement specification will populate the left-side panel.
- Execute Requirement Operations: Click the Create button under Requirement Operations, populate the necessary technical parameters, and click Save.
Linking Requirements to Test Cases
To achieve end-to-end traceability, requirements must be directly mapped to corresponding test cases. This linkage empowers QA leads to audit test coverage dynamically via reporting dashboards, identifying unverified requirements and closing coverage gaps.

- Open a Test Case: Access the desired test case via the Test Specification module.
- Launch the Requirements Dialog: Click the Requirements icon embedded within the test case interface.
- Select Specifications: Choose the appropriate requirements specification from the drop-down menu and check the boxes next to the relevant requirements.
- Finalize Assignment: Click the Assign button to lock the mapping. The selected requirements will now appear in the assigned requirements section of the test case.
Test Execution Workflows
Executing test cases and recording accurate outcomes are vital for assessing software stability. TestLink facilitates systematic test execution while maintaining a transparent audit trail of system behavior.

Execution Status Framework
When a test case is evaluated, it can be marked with one of several definitive statuses:

- Passed: The application behavior matches the expected result.
- Failed: A defect or discrepancy was discovered.
- Blocked: Execution was halted due to an external dependency, environment failure, or blocking bug.
Note: Prior to execution, test cases remain in a "Not Run" state. Once an execution result is submitted and saved, the status cannot be reverted to "Not Run," ensuring historical accuracy in test metrics.

Step-by-Step Test Execution
- Access Test Execution: Click the Test Execution link on the navigation bar to open the execution panel.
- Select the Target: Choose the specific test case or test suite from the hierarchical tree on the left-side panel.
- Record Results and Notes: Select the appropriate execution status (Passed, Failed, or Blocked) and provide detailed technical notes or defect IDs in the text field.
- Save Execution Data: Click the Save execution button to commit the results to the database.
Generating Comprehensive Test Reports
Test reports serve as objective evidence of software quality, verifying that products meet predefined acceptance criteria before release. TestLink features a robust report generation engine capable of exporting data into multiple formats, including HTML, MS Word, MS Excel, OpenOffice Writer, and OpenOffice Calc.

Step-by-Step Report Generation
- Navigate to Reports: Click the Test Reports link on the main navigation bar.
- Select Report Type: Choose Test Report from the left-side menu.
- Customize Content: Select the specific metrics, test suites, and metadata to include by checking the corresponding configuration checkboxes.
- Choose Output Format: Adjust the report format using the highlighted dropdown menu to match organizational documentation standards.
- Generate Output: Click on the target Test Project folder structure in the right-side panel to compile and download the report.
Similar workflows apply for generating aggregated Test Plan reports.

Data Portability: Exporting and Importing Test Cases and Test Suites
In dynamic enterprise environments, infrastructure migrations, server updates, and multi-team collaborations often necessitate moving test assets between different TestLink instances. Re-authoring test suites manually across platforms introduces unnecessary administrative overhead and human error. TestLink addresses this challenge through a robust XML-based export and import mechanism.

Exporting Test Cases and Test Suites
- Select Assets: Navigate to the Test Specification page and highlight the test case or test suite you wish to export.
- Access Operations: Click the settings icon on the right-side panel to reveal available operations.
- Initiate Export: Click the Export button.
- Confirm Parameters: Check all relevant configuration checkboxes and click Export. The system will bundle the selected assets into an XML file and download it to your local drive.
Importing Test Cases and Test Suites
- Target Destination: Select the destination test suite folder within the tree structure where the imported assets should reside.
- Open Operations: Click the settings icon in the right-side panel.
- Initiate Import: Select the Import button.
- Upload File: Browse your local drive to attach the previously exported XML file, then click Upload file.
- Verify Integration: The imported test cases and suites will automatically populate within the designated folder on the left-side panel.
Implications and Future Outlook
While manual test execution remains a staple for exploratory and user-acceptance testing, modern CI/CD pipelines demand automation and remote synchronization. TestLink accommodates this architectural shift by offering a comprehensive Application Programming Interface (API).

As teams look toward the future of efficient software delivery, integrating test management tools with automated execution frameworks—such as driving test status updates remotely via Selenium WebDriver scripts using the TestLink API—eliminates repetitive manual tasks. Part 3 of this series will explore these advanced automation concepts, demonstrating how engineering teams can leverage APIs to streamline continuous testing workflows.