Mastering TestLink: Advanced Test Management, Execution, and Migration Strategies
Introduction
In the rapidly evolving landscape of software engineering, maintaining rigorous quality assurance (QA) standards requires robust test management infrastructure. Following the foundational principles established in Part 1 of the "Learning TestLink Test Management Tool" series—which covered initial system installation, test plan creation, and the drafting of baseline test cases—Part 2 delves into the platform’s advanced operational capabilities.

As software release cycles compress and applications grow increasingly complex, modern QA teams must move beyond simple authoring. They need sophisticated mechanisms for managing user permissions, tracing software requirements, executing granular test cycles, generating comprehensive compliance reports, and seamlessly migrating test assets across environments.

This comprehensive guide explores the core administrative and execution features of TestLink, offering a detailed roadmap for QA professionals seeking to optimize their test management workflows.

Administrative Control: User Management and Role-Based Access
In enterprise software testing environments, security, accountability, and controlled access are paramount. TestLink provides a granular role-based access control (RBAC) architecture that restricts system permissions based on assigned user roles, safeguarding test specifications and execution logs from unauthorized alterations.

Default Roles and Custom Permissions
TestLink features several built-in administrative and operational roles, ranging from standard testers with limited execution rights to senior test leads and administrators who manage entire project repositories. However, real-world organizations often demand custom security matrices. TestLink allows administrators to configure tailored custom roles with precise permissions, ensuring that team members only access the modules relevant to their responsibilities.

Step-by-Step: Creating Users and Assigning Roles
Configuring users and mapping them to specific projects or test plans involves a straightforward administrative workflow:

- Access the Administration Panel: Navigate to the top menu bar and click on the Users/Roles link to open the user management dashboard.
- Initiate User Creation: Click on the Create button to open the new user registration form.
- Populate User Credentials: Input the required details, including the unique username, contact information, and initial role designation. Click Save to commit the user profile to the system database.
- Assign Project-Level Roles: Switch to the Assign Test Project Roles tab. Select the target test project and the appropriate role from the corresponding drop-down menus.
- Assign Plan-Level Roles: Similarly, navigate to the Assign Test Plan Roles tab to grant specific permissions tailored to individual test plans.
Requirements Management: Ensuring Complete Test Coverage
A fundamental challenge in software testing is proving that every business constraint, user story, and technical specification has been adequately validated. Requirements management bridges the gap between product specifications and quality assurance execution.

Defining Requirements in TestLink
In software engineering terminology, a requirement is a mandatory condition or capability that the software must satisfy. TestLink enables teams to centralize these requirements directly within the testing ecosystem:

- Navigate to Requirements: Click on the Requirements link on the primary navigation bar to access the requirements management workspace.
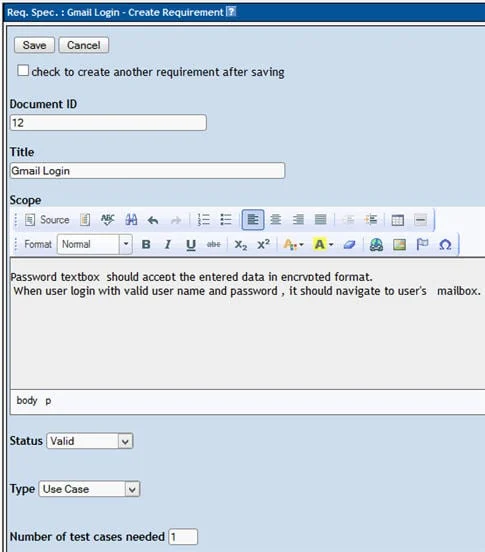
- Create a Requirement Specification: Click the Create button, then supply the Document ID, Title, and a comprehensive Description of the requirement. Save the entry.
- Structure Operations: The newly created requirement specification will appear in the left-hand navigation panel. Expand the operations menu and click Create under the specific requirement module to add granular requirement items.
Linking Requirements to Test Cases
One of TestLink’s most powerful features is the ability to link specific requirements directly to individual test cases. This linkage provides real-time traceability and visibility into test coverage.

By reviewing built-in requirements reports, QA managers can instantly identify untested features, uncover coverage gaps, and adjust test suites to achieve maximum application validation.

How to Assign a Requirement to a Test Case:
- Open any existing test case via the Test Specification module.
- Click on the Requirements icon located on the test case toolbar to launch the requirements mapping dialog.
- Select the desired requirement specification from the drop-down menu and check the boxes next to the relevant requirements.
- Click the Assign button. The selected requirements will now appear in the assigned requirements section, officially binding the business rule to the test procedure.
Test Execution and Status Management
Once test cases are written, reviewed, and linked to requirements, the project transitions into the execution phase. TestLink provides a centralized environment for running test procedures and recording real-time outcomes.

The Lifecycle of Test Execution Status
During a test cycle, every test case assumes one of several execution states:

- Not Run: The initial, default state of a newly added test case. Once a test case has been updated from this state, TestLink’s audit trail prevents it from reverting to "Not Run," ensuring historical accuracy.
- Passed: Indicates that the software successfully met the expected results outlined in the test steps.
- Failed: Denotes a discrepancy between actual and expected results, signaling a potential software defect.
- Blocked: Indicates that external impediments—such as a dependent server outage or an unresolved upstream bug—prevented the execution of the test case.
Executing a Test Case Step-by-Step
- Launch the Execution Panel: Click on the Test Execution link in the main navigation bar.
- Select the Target Test Case: Use the left-hand project tree to navigate through test suites and select the specific test case you wish to execute.
- Record Outcomes: Choose the appropriate execution status (Pass, Fail, or Blocked) and document detailed execution notes, error logs, or environment specifics in the provided text fields.
- Save the Result: Click Save execution. TestLink immediately records the status update, timestamp, and tester details, updating the overarching test plan metrics.
Reporting and Documentation
Stakeholders, project managers, and clients rely on definitive metrics to assess software readiness. TestLink includes a robust reporting engine capable of generating detailed execution and traceability reports across multiple industry-standard formats, including HTML, MS Word, MS Excel, OpenOffice Writer, and OpenOffice Calc.

Generating Custom Test Reports
- Access the Reporting Module: Click on the Test Reports link on the top navigation bar.
- Select Report Type: Choose the desired report scope (such as Test Report or Test Plan Report) from the left-side panel.
- Customize Content: Use the provided checkboxes to select specific data sets, metrics, and summary tables to include in the output.
- Choose Output Format: Select your preferred document format from the configuration dropdown menu.
- Compile the Report: Click on the test project folder structure in the right-hand panel. TestLink will compile and generate the formatted report for immediate download and distribution.
Asset Mobility: Exporting and Importing Test Cases and Suites
As organizations scale infrastructure, migrate to cloud-based servers, or restructure repositories, the ability to transfer test assets without data loss becomes essential. TestLink’s native XML export and import utilities eliminate the administrative overhead of recreating test suites manually.

Exporting Test Cases and Test Suites
- Navigate to the Test Specification page and select the test case or entire test suite folder you wish to export.
- Click the settings icon on the right-hand panel to reveal available test case operations.
- Click the Export button.
- Check all required configuration options and click Export. The system packages the asset into an XML file and downloads it directly to your local drive.
Importing Test Cases and Test Suites
- Select the destination test suite folder in the left-hand panel where the imported assets should reside.
- Access the settings icon on the right-hand panel to view available operations.
- Click the Import button.
- Browse your local drive to attach the previously exported XML test case or test suite file, then click Upload file.
- The imported assets will be parsed, validated, and instantly integrated into the project directory tree.
Conclusion and Future Horizons
While TestLink’s manual interface provides an intuitive experience for everyday test management, modern DevOps pipelines demand velocity and automation. Beyond manual browser-based execution, TestLink offers a comprehensive Application Programming Interface (API) that enables seamless integration with external automation frameworks.

In the final installment of this series, we will explore advanced integration techniques—specifically, how to programmatically update test case execution statuses remotely from automated test scripts written in Selenium WebDriver using the TestLink API. Automating these repetitive administrative tasks bridges the gap between automated testing and centralized test management, saving engineering teams valuable time across every release cycle.