Mastering Test Management: A Comprehensive Deep Dive into TestLink’s Advanced Features (Part 2)
Introduction: Elevating Quality Assurance with TestLink
In the fast-paced ecosystem of modern software engineering, robust quality assurance (QA) is no longer just an optional checkpoint; it is a critical pillar of product delivery. Building upon the foundational steps established in Part 1 of our "Learning TestLink Test Management Tool" series—which guided teams through initial installations, test plan configurations, and manual test case creation—this second installment explores the platform’s advanced operational capabilities.

As organizations scale, managing testing workflows requires more than just drafting checklists. It demands rigorous requirement tracing, granular access control, structured execution tracking, and seamless cross-server data portability. This comprehensive guide details how QA teams can leverage TestLink’s enterprise features to optimize their software testing lifecycles (STLC), improve test coverage, and streamline reporting.

1. User Management, Security, and Role-Based Access Control
In any collaborative development and testing environment, data integrity and security are paramount. TestLink addresses this by enforcing a granular permission model through user roles. By default, the platform comes pre-configured with standard roles—such as Administrator, Senior QA, Tester, and Guest—each tailored to restrict or grant specific access rights across the platform.

Custom Roles and Permissions
Beyond default definitions, TestLink allows project administrators to craft bespoke user roles. Organizations can selectively enable or disable permissions—such as modifying test specifications, executing test runs, or generating executive reports—tailoring access to match exact corporate hierarchies and workflows.

Step-by-Step: Creating Users and Assigning Roles
- Navigate to Administration: Locate and click on the Users/Roles link in the global TestLink navigation bar to access the user directory.
- Initialize User Creation: Click the Create button to open the user registration form.
- Enter User Metadata: Input the required credentials, including the username, personal details, and primary global role, then click Save.
- Assign Test Project Roles: Switch to the Assign Test Project Roles tab. Choose the target project from the drop-down menu and designate the appropriate security role for the user.
- Assign Test Plan Roles: Similarly, administrators can navigate to the Assign Test Plan Roles tab to limit or expand user access down to specific test execution cycles.
2. Requirements Management: Establishing a Baseline for Quality
A software requirement defines a specific condition, constraint, or capability that a system must satisfy to deliver value to its users. In TestLink, the requirements management module acts as a bridge between business analysts, product owners, and QA engineers.

Why Requirements Matter in QA
By defining requirements directly within TestLink, teams establish a centralized repository of expected system behaviors. This ensures that every test case written maps back to a genuine business or functional need, thereby eliminating redundant testing and identifying coverage gaps early in the development cycle.

Step-by-Step: Writing and Managing Requirements
- Access the Requirements Module: Click on the Requirements link in the main navigation dashboard.
- Create Requirement Specification: Click the Create button to initialize a new requirements document.
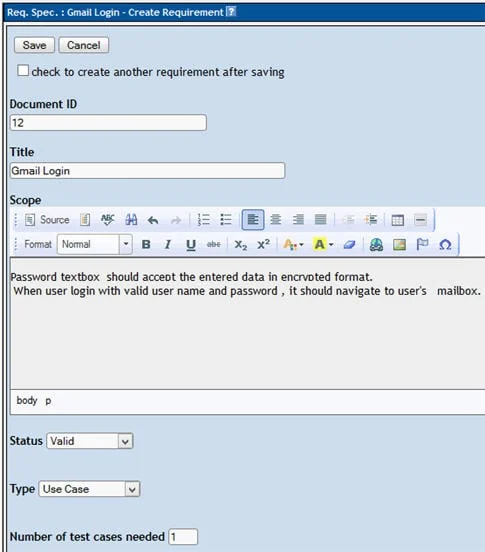
- Define Document Metadata: Enter the Document ID, Title, and a comprehensive Description of the requirement, then click Save.
- Build Requirement Operations: Once the requirement specification is rendered on the left-side navigation panel, click the Create button within the Requirements Operations menu.
- Finalize Specifications: Fill in the detailed parameters and click Save to anchor the requirement within the system.
3. Bridging the Gap: Assigning Requirements to Test Cases
One of TestLink’s most powerful analytical features is its ability to link individual test cases directly to specific requirements. This traceability matrix allows QA leads to monitor real-time test coverage.

Through built-in reports, teams can instantly identify orphaned requirements—those lacking test coverage—and dynamically update test suites to ensure 100% functional validation before deployment.

Step-by-Step: Linking Requirements to Test Cases
- Open Test Specification: Navigate to the test suite and open the specific test case you wish to link.
- Access Requirements Dialog: Click on the dedicated Requirements icon located on the test case interface.
- Select Specification: Choose the relevant requirements specification from the drop-down menu.
- Check and Assign: Select the checkboxes corresponding to the specific requirements you want to target, then click the Assign button. The chosen requirements will immediately appear in the assigned section, confirming a successful link.
4. Test Case Execution and Status Tracking
Once test cases are written and requirements are linked, the testing phase officially begins. TestLink provides a straightforward interface for manual test execution, allowing testers to record outcomes in real time.

Understanding Execution States
A test case in TestLink can hold one of several execution statuses: Passed, Failed, or Blocked.

- The "Not Run" Rule: Initially, every test case resides in a "Not Run" state. Once a test handler updates its status to Pass, Fail, or Blocked, TestLink locks that execution cycle; users cannot manually revert a test status back to "Not Run," ensuring an immutable audit trail of testing progress.
Step-by-Step: Executing Test Cases
- Launch Test Execution: Click on the Test Execution link in the top navigation panel.
- Select Target Test Case: Use the left-hand directory tree to locate and select the specific test case or test suite you want to execute.
- Record Outcome and Notes: Choose the appropriate execution status (Passed, Failed, or Blocked) and input detailed execution notes or defect summaries in the provided text field.
- Save Execution Data: Click the Save execution button to commit the results to the database and update the project’s real-time metrics.
5. Generating Comprehensive Test Reports
Test reports serve as objective evidence of software quality, regulatory compliance, and system stability. TestLink eliminates the need for manual metric compilation by offering a robust, built-in reporting engine.

Supported Export Formats
TestLink empowers teams to generate reports in multiple industry-standard formats, including HTML, Microsoft Word, Microsoft Excel, OpenOffice Writer, and OpenOffice Calc, making it easy to share insights with non-technical stakeholders, clients, and executive leadership.

Step-by-Step: Generating Reports
- Navigate to Reports: Click on the Test Reports link in the navigation bar.
- Select Report Type: Choose the Test Report option from the left-hand panel.
- Configure Content Parameters: Use the checkboxes to select the specific data points, execution summaries, and metrics you want to include in the document.
- Choose Format and Generate: Select your desired output format from the highlighted drop-down menu, then click on the target Test Project folder structure in the right-hand panel to compile and download your report.
6. Portability: Exporting and Importing Test Cases and Suites
As development environments evolve, organizations frequently migrate infrastructure, upgrade servers, or spin up isolated instances for distinct client projects. Re-creating entire test repositories manually during such transitions is inefficient and prone to human error.

The Export/Import Advantage
TestLink’s XML-based export and import capabilities eliminate this administrative overhead. Teams can bundle complete test projects or granular test suites, export them locally, and import them seamlessly into alternative TestLink servers without losing structure, steps, or metadata.

Step-by-Step: Exporting Test Cases/Suites
- Select Target Asset: Navigate to the Test Specification page and highlight the test case or test suite you wish to export.
- Open Operations Menu: Click the settings icon on the right-hand panel to reveal available test case operations.
- Initiate Export: Click the Export button.
- Confirm Parameters: Check all relevant configuration checkboxes and click Export. The system will package the assets into an XML file and download it directly to your local drive.
Step-by-Step: Importing Test Cases/Suites
- Choose Destination Folder: Navigate to the test suite folder within your new TestLink environment where the imported data should reside.
- Access Import Operations: Click the settings icon on the right panel to view structural operations.
- Select Import: Click the Import button.
- Upload XML File: Browse your local drive to attach the previously exported XML test case file, then click Upload file. The imported assets will immediately populate the left-hand navigation tree.
Conclusion and Future Outlook
While manual execution forms the backbone of foundational QA workflows, TestLink is built to scale beyond manual interactions. The platform natively supports a robust Application Programming Interface (API), enabling developers and QA engineers to update test case execution statuses programmatically.

In the upcoming third and final installment of this series, we will explore advanced automation concepts—specifically, how to programmatically update test execution statuses in TestLink remotely using Selenium WebDriver scripts driven by the TestLink API. Automating these repetitive administrative tasks allows engineering teams to focus entirely on building better software while saving countless hours of manual effort.