The Art of Seamless Illumination: How a Maker Solved the Ultimate LED Matrix Dilemma Using 3D Printing and Baking Paper
By Technology and Hardware Desk
Published: October 24, 2023
Main Facts
In the realm of DIY electronics, addressable RGB LED matrices have long been a cornerstone for creators, hobbyists, and digital artists looking to build vibrant displays, custom clocks, and interactive art installations. However, anyone who has ever powered on a standard 64×64 LED matrix is intimately familiar with a frustrating aesthetic flaw: the "hotspot" and halo effect. Instead of a smooth, uniform surface of glowing color, builders are usually greeted by harsh, glaring individual diodes, light bleed that blurs adjacent pixels, and uneven luminance across the display panel.
Enter maker and designer Davisan1001, who has engineered an elegantly simple, highly effective, and remarkably inexpensive solution to this classic optical problem. By combining precision 3D-printing techniques with surprisingly humble household materials—specifically, standard baking paper—Davisan1001 has developed a custom enclosure and diffusion system that transforms a pixelated 64×64 RGB LED matrix into a smooth, professional-grade glowing surface.
The core of the innovation lies in a custom-engineered, multi-layered sandwich design. The assembly features a specially designed 3D-printed optical grid that isolates each individual LED, preventing light from spilling into neighboring cells. Placed directly over this grid is a sheet of ordinary baking paper, which acts as a near-perfect optical diffuser. Finally, a clear protective plastic sheet caps off the sandwich, offering structural rigidity and safeguarding the delicate paper layer beneath.
Designed to house both the LED matrix and a fully integrated Raspberry Pi single-board computer, the enclosure streamlines the hardware stack into a tidy, self-contained unit. By manipulating standard 3D slicer settings to generate the internal grid automatically—eliminating the need for tedious manual CAD modeling—Davisan1001 has created an open-source project that is entirely accessible to makers of all skill levels, requiring only standard desktop fabrication tools and off-the-shelf components.
Chronology of the Project
The journey from a glaring, pixelated LED panel to a polished, diffused display did not happen overnight. It represents the culmination of iterative prototyping, material testing, and creative problem-solving typical of the modern maker movement.
Phase 1: Identifying the Optical Bottleneck
The genesis of the project began with a common frustration familiar to digital fabricators. When mounting a high-density 64×64 RGB LED matrix inside a standard frame, the distance between the face of the LEDs and the exterior diffuser plate is often too shallow to allow natural light mixing. If the diffuser is placed too close, individual pixels remain jarringly distinct. If it is moved too far away, light bleeds laterally across the panel, turning sharp graphics into a muddy, washed-out blur. Davisan1001 recognized that to achieve a crisp yet uniform image, physical barriers were required between the light sources before the light hit the diffusion medium.
Phase 2: Experimenting with Slicer-Generated Geometry
Designing a grid with 4,096 individual cells (matching the 64×64 matrix) manually in CAD would be a tedious, resource-heavy undertaking that would strain most consumer-grade 3D modeling software. Davisan1001 bypassed this bottleneck through an ingenious manipulation of 3D printing slicer settings. By instructing the slicer to print a flat, solid-outline square utilizing exclusively a grid infill pattern—while setting the top and bottom solid layers to zero—the software automatically generated a precise, repeating lattice network. This method allowed the maker to control wall thickness and cell dimension simply by adjusting standard infill density and line width parameters in software like Cura or PrusaSlicer.
Phase 3: Material Benchmarking and Selection
With the physical grid structural framework established, the next hurdle was selecting the optimal diffusion medium. Through trial and error, Davisan1001 tested several common materials:
- Plain White Printer Paper: Tested early in the process, standard copy paper proved far too dense, blocking an unacceptable amount of luminance and rendering the display dim and lifeless.
- Waxed Paper: While offering better light transmission than printer paper, waxed paper yielded inconsistent optical output and suffered from severe chromatic distortion and poor off-axis viewing angles.
- Baking Paper (Parchment Paper): The clear winner. Baking paper offered an optimal balance of opacity and light transmission, diffusing the photons evenly across its surface without choking the brightness of the underlying LEDs.
Phase 4: Enclosure Integration and Raspberry Pi Mount
Having perfected the optical stack, Davisan1001 moved on to housing the electronics. Because many LED matrix projects require a dedicated controller to run animations, clocks, or interactive scripts, the enclosure was designed with a dedicated mounting bracket for a Raspberry Pi. This integration ensured that the processing brain and the display output remained physically unified, eliminating cable clutter and making the entire unit portable and easy to mount on a wall or display stand.
Phase 5: Open-Source Release on Thingiverse
With the prototype finalized, tested, and refined, Davisan1001 packaged the project files, printing instructions, and assembly documentation, publishing them to Thingiverse under the project identifier thing:6687509. This allowed the global maker community to replicate, critique, and build upon the design.
Supporting Data and Technical Specifications
To truly appreciate the engineering behind Davisan1001’s diffuser, it is helpful to examine the scale of the hardware involved and the optical physics at play.
Hardware Architecture
- Display Panel: Standard 64×64 RGB LED Matrix (typically operating on HUB75 protocol). This yields a total of 4,096 individually addressable pixels packed into a dense spatial grid.
- Processing Unit: Raspberry Pi (compatible with models featuring standard 40-pin GPIO headers, capable of driving HUB75 matrices via specialized driver hats or direct wiring).
- Fabrication Medium: Fused Deposition Modeling (FDM) 3D printer using standard filaments (PLA or PETG recommended for structural stability).
- Optical Stack:
- 3D-printed optical isolation grid (generated via slicer infill manipulation).
- Industrial or culinary baking paper (parchment paper) acting as a primary light softener.
- Clear acrylic or PETG protective plastic sheeting serving as the outermost structural faceplate.
Optical Dynamics
The primary challenge of an LED matrix is managing the inverse-square law of light dispersal within a confined depth. Without internal optical walls (often called a "blinder" or "egg-crate" grid), light emitted from a single red, green, or blue sub-pixel radiates outward in a hemispherical wave. When millions of these waves intersect inside an enclosure, they wash out neighboring pixels, destroying contrast ratios.
By implementing the 3D-printed grid, Davisan1001 creates optical "tunnels" corresponding 1:1 with each of the 4,096 LEDs. Each cell walls off its assigned pixel, forcing the light to travel forward linearly. When the column of light exits the tunnel, it strikes the baking paper. The microscopic fibers in the parchment paper scatter the concentrated beam of light in random directions (mie scattering), blurring the harsh point-source edges into a smooth, cohesive square pixel while maintaining clean separation from adjacent pixels. The final clear plastic sheet shields the fragile paper from dust and physical indentation while providing a glossy, premium surface finish.
Official Responses and Community Reception
Since its publication on Thingiverse, Davisan1001’s project has garnered significant attention across maker forums, Reddit communities, and digital fabrication blogs. While official corporate statements are absent—given that this is a grassroots, open-source community creation—the response from the maker ecosystem has been overwhelmingly positive.
Makers and electronics enthusiasts have praised the project for its ingenuity in repurposing standard household items. On community boards, users who previously struggled with expensive custom-milled acrylic diffusers or specialized frosted polycarbonate sheets highlighted the baking paper hack as a masterclass in frugal engineering.
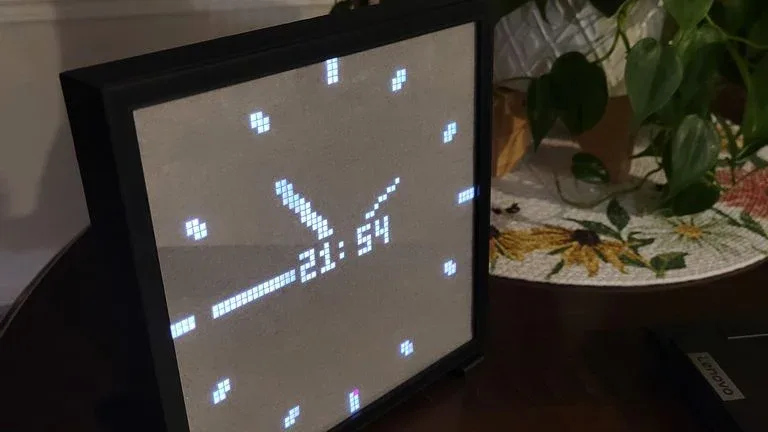
Furthermore, digital artists who utilize LED matrices for ambient lighting and pixel art clocks have lauded the visual results. Reviewers noted that the combination of the slicer-generated grid and parchment paper successfully eliminates the "screen-door effect" common in cheap displays while preserving the distinct, retro aesthetic of chunky pixel art. Several community members have already begun experimenting with scaling the technique up for larger 128×64 matrices or adapting the slicer-grid method for curved and non-standard installations.
Implications and Future Outlook
Davisan1001’s innovative approach to LED diffusion carries several important implications for the future of DIY electronics, prototyping, and educational maker spaces.
Democratization of Professional-Grade Aesthetics
Historically, achieving a polished, commercial-grade finish on custom electronics projects required access to expensive industrial fabrication techniques, such as laser-cut frosted acrylic sandwiches, CNC-milled light channels, or custom-molded silicone diffusers. By demonstrating that high-end optical performance can be achieved using a standard desktop 3D printer and inexpensive baking paper, the project lowers the barrier to entry for beginners. Makers can now produce professional-looking art pieces, smart home dashboards, and visual displays on a strict budget.
Innovations in Slicer-Based Parametric Design
Perhaps the most enduring technical takeaway from Davisan1001’s work is the clever exploitation of 3D slicer settings to generate complex internal geometries without traditional CAD modeling. This technique—using infill patterns as functional mechanical components—opens up exciting new avenues for rapid prototyping. Designers can create custom air filters, acoustic baffling, honeycomb structural panels, and optical lenses simply by manipulating infill densities, line types, and shell counts, entirely bypassing the sluggish workflow of traditional CAD software.
Environmental and Resource Efficiency
In an era where electronic waste and material consumption are under increasing scrutiny, the ability to leverage lightweight 3D prints combined with readily available, biodegradable materials like parchment paper represents a win for sustainable design. The minimal amount of filament required to print the internal grid, coupled with the avoidance of specialized, energy-intensive synthetic diffusers, points toward a more resource-conscious future for DIY hardware development.
Conclusion
Davisan1001 has proven that solving complex engineering problems does not always require industrial budgets or advanced laboratory equipment. Through a clever intersection of 3D printing software tricks, thoughtful mechanical design, and everyday baking supplies, the maker has permanently elevated the standard for DIY LED matrix projects. As the open-source files continue to circulate and inspire new iterations across the globe, this elegant diffusion technique stands as a shining example of ingenuity within the modern maker community.