Illuminating the Future: A Comprehensive Guide to Wi-Fi-Enabled NeoPixel Installations
Introduction: The Evolution of Intelligent Lighting
In recent years, the landscape of decorative and functional lighting has been fundamentally reshaped by the advent of addressable LEDs. Leading this revolution is the NeoPixel—a sophisticated innovation by Adafruit Industries that integrates an RGB LED with a dedicated controller into a single, compact surface-mount package. By enabling individual control over the color and brightness of every pixel in a series, NeoPixels have moved beyond simple indicators to become the building blocks of complex digital art, wearable technology, and smart home lighting solutions.
Traditionally, managing these installations required hard-wired connections or local microcontrollers running static, pre-programmed animation loops. This approach, while effective for simple tasks, proves cumbersome for modern, distributed home automation. This article explores a professional-grade approach to lighting: creating a wireless, network-integrated ecosystem using Fishino and NodeMCU boards, managed by a centralized Python controller.
The Technical Foundation: Why NeoPixels Matter
The NeoPixel is defined by its ability to receive data via a single digital pin. Each LED contains a WS2811 or WS2812 driver, which interprets a stream of data packets—typically 24 bits of color information per pixel—to determine its state.
Key Technical Specifications
- Integrated Driver: The WS2812B protocol allows for high-speed data transmission, enabling smooth, fluid animations.
- Addressing Capability: Because each LED consumes its specific data packet and passes the rest along the chain, developers can control thousands of LEDs using only a single microcontroller pin.
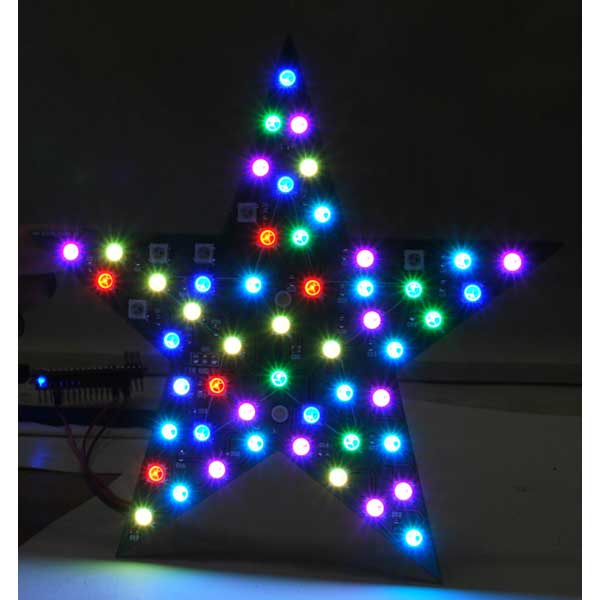
- Versatility: From flexible strips and rings to rigid matrices and custom PCB shapes (like the Christmas Star, part FT1300M), the form factor is limited only by design requirements.
However, the primary hurdle in widespread NeoPixel deployment is the "tethering" problem. Moving from a USB-linked system to a distributed, Wi-Fi-enabled network allows for dynamic control, remote updates, and synchronized light shows across multiple rooms.
Chronology of the Project Implementation
The development of this Wi-Fi-controlled system followed a structured, multi-phase engineering lifecycle:
- Phase I: Architecture Selection. We evaluated the ESP8266 chip as the ideal candidate for this project due to its low cost, robust community support, and native Wi-Fi capabilities. We selected the Fishino Guppy for its Arduino-compatibility and the NodeMCU for its compact, integrated development environment.
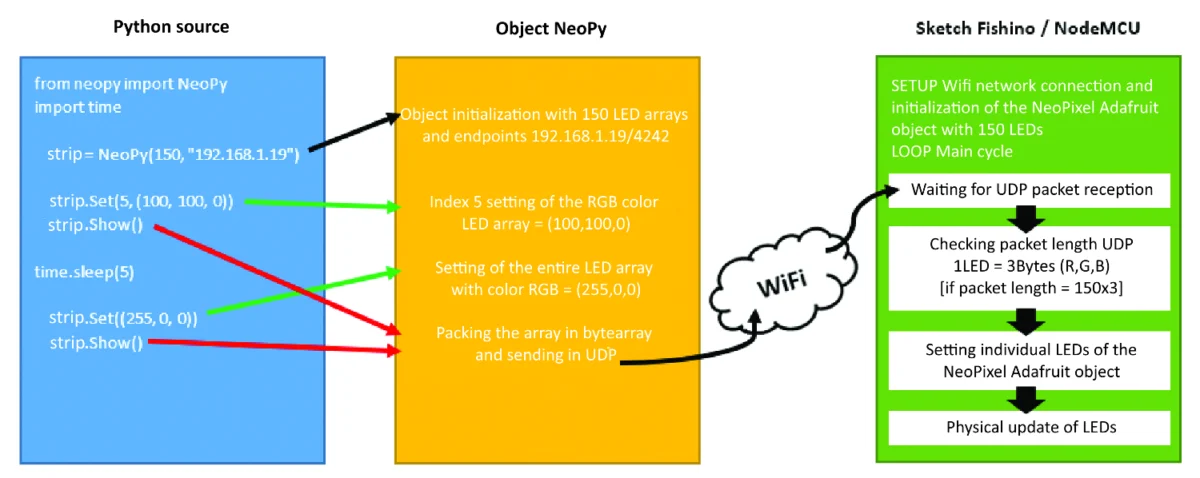
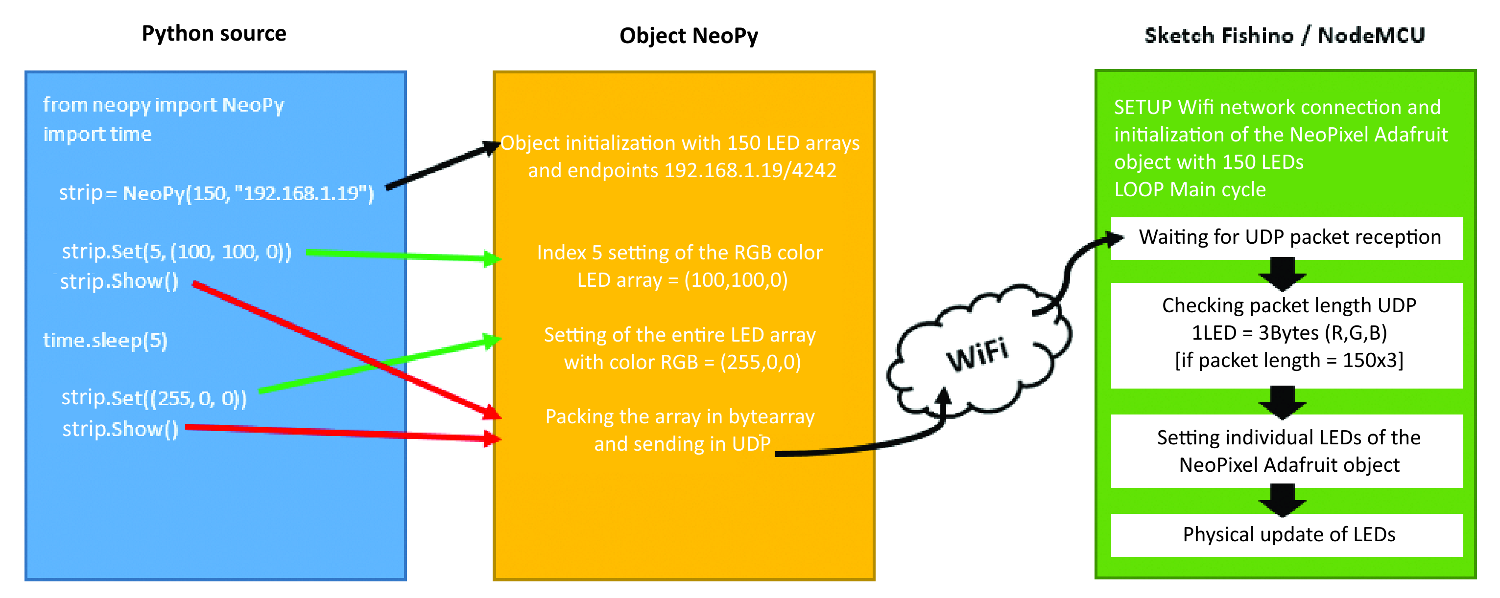
- Phase II: Protocol Design. To minimize latency, we opted for the User Datagram Protocol (UDP). Unlike TCP, which requires a "handshake" and overhead to ensure packet delivery, UDP offers the speed necessary for high-frequency animation updates.
- Phase III: Software Abstraction. The creation of the
NeoPyPython library was essential. This library acts as a middleware, allowing users to write complex animation logic on a PC or Raspberry Pi while offloading the "heavy lifting" of bit-banging the LEDs to the microcontrollers. - Phase IV: Hardware Integration. The physical installation involved power distribution, voltage shifting, and signal filtering.
- Phase V: Scheduling and Deployment. Finally, the automation layer was implemented using Linux’s
crontabto ensure the lighting system operates autonomously.
Supporting Data and Hardware Requirements
To replicate this project, precision in hardware selection is paramount, particularly regarding power management.
Component Bill of Materials (BOM)
- Microcontrollers: Fishino Guppy and NodeMCU (ESP8266-based).
- Lighting: 5-meter WS2812B NeoPixel strip (300 LEDs) and an FT1300M Christmas Star (56 LEDs).
- Power Management: A 5V, 50W Switching Power Supply. Note: Always calculate current draw; at full white brightness, an LED draws 60mA. A 150-LED strip can peak at 9A, necessitating a robust power supply.
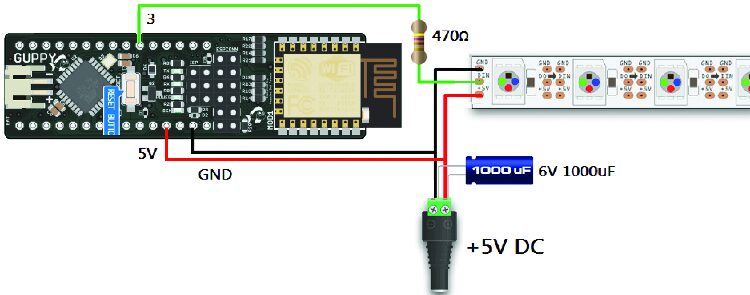
- Signal Integrity: 470-ohm resistors (to protect the first pixel) and 1,000µF capacitors (to smooth voltage ripples).
- Logic Level Shifting: A 3.3V to 5V converter (LLCTTL) for the NodeMCU, as it operates at 3.3V logic while the LEDs require 5V.
Engineering Best Practices
When dealing with addressable LEDs, power injection is a common point of failure. With long strips, voltage drop becomes significant. Engineers should ensure that power is injected at both ends of the strip to maintain color consistency across the entire length. Furthermore, the use of a 470-ohm resistor on the data line is not merely a suggestion—it prevents signal noise from causing "glitches" or flickering in the first few LEDs of an array.
Official Responses and Theoretical Implications
The transition toward Wi-Fi-based lighting control has significant implications for both professional installations and consumer-grade smart home setups.
Performance Considerations
In our testing, the UDP-based transmission proved highly effective. By sending RGB byte arrays directly to the microcontroller’s UDP buffer, we bypassed the need for complex web servers on the microcontrollers. This keeps the firmware "lean," ensuring that the ESP8266 has maximum processing power available to handle the high-speed timing requirements of the WS2812 protocol.
Scalability
One of the most profound implications of the NeoPy library is its ability to treat multiple microcontrollers as nodes in a network. A single Raspberry Pi can act as a "master controller," broadcasting packets to multiple IP addresses simultaneously. This allows for room-to-room synchronization, where a single command can initiate a "sunrise" effect across every LED strip in a home.
Advanced Automation: The Role of Raspberry Pi
While the Python scripts run perfectly on a Windows or macOS desktop, the project reaches its true potential when deployed on a Raspberry Pi.
Why Raspberry Pi?
The Raspberry Pi acts as a low-power, "always-on" server. Its power consumption is negligible compared to a desktop PC, making it the ideal choice for a 24/7 home automation controller. By utilizing the Linux crontab scheduler, we can program specific lighting behaviors:
- Sunrise Simulation: Slowly ramping up brightness in the morning hours to assist with natural waking.
- Presence Simulation: Triggering randomized patterns in various rooms while the owner is away, providing a deterrent for intruders.
- Contextual Lighting: Integrating the lighting with other sensors (e.g., motion or light sensors) to ensure lights are only active when necessary.
Configuring the Scheduler
The crontab utility uses a simple syntax: MI H D MO DW COMMAND.
For instance, the command 0 18 * * * python3 /home/pi/NeoPy/evening_theme.py triggers an evening lighting sequence at 6:00 PM every single day. This level of automation turns a simple hardware project into a sophisticated, invisible utility that enhances the living environment.
Conclusion: The Future of Modular Lighting
This project demonstrates that the barrier to entry for professional-level smart lighting has been significantly lowered. By decoupling the "animation logic" (Python/Raspberry Pi) from the "hardware driver" (NodeMCU/Fishino), we create a modular system that is easy to maintain and expand.
Whether you are a developer looking to experiment with network protocols or a hobbyist aiming to automate your home for the holidays, this architecture provides a scalable framework. As we look toward the future, the integration of such systems with voice assistants, machine learning-based color adjustment, and real-time environmental data will likely define the next generation of intelligent, ambient lighting.
For those ready to begin, the source code and documentation are available via the Open Electronics GitHub repository, offering a community-driven path to mastering the art of the NeoPixel.