Mastering TestLink: A Comprehensive Guide to Advanced Test Management, Requirements, and Execution
Introduction
In the modern software development lifecycle (SDLC), efficient test management is the backbone of quality assurance. As teams strive for faster release cycles and higher code reliability, the tools they employ to organize, track, and report on testing efforts become mission-critical. Building upon the foundational knowledge of installation and initial setup covered in the first part of this tutorial series, we now shift our focus to the advanced operational capabilities of TestLink.

TestLink remains one of the most widely utilized open-source test management tools globally, prized for its ability to bridge the gap between abstract requirements and granular test execution. This article serves as a deep dive into the practical application of TestLink’s most robust features: comprehensive user role management, the integration of requirements, systematic test case execution, and the generation of actionable reports.

The Role of TestLink in Modern Quality Assurance
TestLink is more than just a repository for test cases; it is a centralized hub for the entire QA ecosystem. By providing a structured environment, it ensures that every line of code is mapped to a requirement and every defect is linked to a specific test execution instance. This traceability is vital for compliance-heavy industries and agile teams alike.

Core Features Overview
- Requirements Management: Allows teams to define, organize, and track software requirements directly within the testing suite.
- Test Case Execution: Provides a robust interface for testers to record outcomes, document notes, and manage the lifecycle of a test.
- Reporting: Offers built-in analytics to visualize test coverage, success rates, and project health.
- Portability: Simplifies the migration of test assets between different environments through XML-based import/export functionality.
Chronology of Operations: Setting Up for Success
Effective testing in TestLink requires a systematic approach. Before a single test case is executed, the environment must be configured to ensure proper access control and requirement alignment.

1. User Administration and Role Assignment
TestLink utilizes a Role-Based Access Control (RBAC) system. By restricting or granting permissions, managers can ensure that sensitive test plans remain protected while allowing developers and testers to contribute efficiently.

Steps for User Management:

- Access Control: Navigate to the ‘Users/Roles’ link in the primary navigation bar.
- Creation: Click the ‘Create’ button to initialize a new user profile. Populate the necessary credentials and role definitions.
- Assignment: To ensure security, assign specific roles to individual test projects. This is achieved via the ‘Assign Test Project Roles’ tab. By selecting the user and the associated project, you enforce granular security.
- Customization: If default roles—such as ‘Admin’, ‘Tester’, or ‘Guest’—do not meet your organizational needs, TestLink allows for the creation of custom roles with specific permissions, granting you absolute control over who can view, modify, or execute tests.
2. Requirements Engineering within TestLink
Requirements are the guiding light for any testing effort. In TestLink, they are treated as first-class entities.

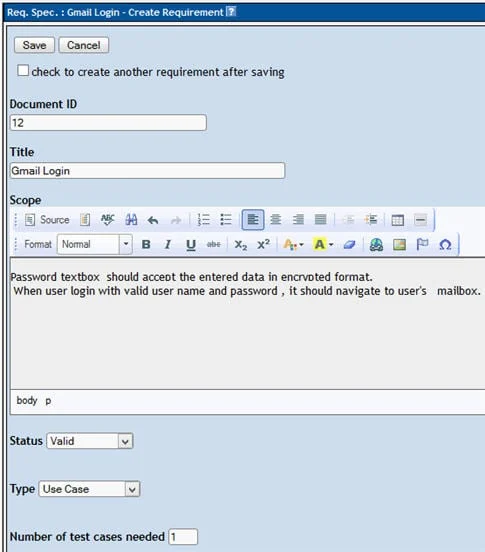
- Defining Requirements: By clicking the ‘Requirements’ link, you can create a repository for project needs. Each requirement is assigned a unique Document ID, Title, and Description.
- The Hierarchical Approach: Once the root specification is established, testers can add detailed requirements to the left-side navigation panel. This structured, folder-like organization allows for a clean overview of complex project scopes.
3. Bridging the Gap: Linking Requirements to Test Cases
The true power of TestLink lies in its Requirement-to-Test-Case coverage. Without this link, it is impossible to verify if the software truly meets its original specifications.

- Linking Process: Open a test case from the Test Specification section and select the ‘Requirements’ icon. A dialogue box will appear, allowing you to select the appropriate requirement from your list.
- Implications for Coverage: Once linked, you can generate reports that highlight "orphaned" requirements—those that have not yet been assigned to a test case. This enables managers to identify gaps in the testing strategy early in the cycle, preventing critical bugs from reaching production.
Executing the Test Lifecycle
Execution is the phase where the "rubber meets the road." TestLink simplifies this by offering a straightforward workflow for recording results.

The Execution Workflow
- Navigating to Execution: Click on ‘Test Execution’ in the top bar.
- Selection: From the left-side tree view, choose the test case or test suite you wish to run.
- Recording Results: TestLink offers three primary statuses: Passed, Failed, or Blocked. It is critical to note that once a test is moved from the initial "Not Run" state to a final state, TestLink keeps a permanent audit trail.
- Adding Context: Use the ‘Notes’ field to provide evidence, screenshots, or links to external bug-tracking tickets. This documentation is essential for developers tasked with fixing failures.
Data Portability: Exporting and Importing Test Assets
One of the most frequent challenges in large organizations is the migration of testing data between servers. Whether upgrading infrastructure or moving to a cloud-based instance, TestLink’s import/export feature is indispensable.

- The Export Logic: By selecting a test suite and choosing ‘Export’ from the settings menu, TestLink generates an XML file. This file contains the entire structure and content of your tests.
- The Import Logic: Conversely, importing allows you to populate a new TestLink installation in seconds, effectively avoiding the manual overhead of recreating hundreds of test cases. To import, navigate to the target test suite, select the ‘Import’ option, browse for your XML file, and finalize the upload.
Supporting Data and Analytics
Test reports serve as the objective evidence required by stakeholders to greenlight a release. TestLink’s reporting engine is highly versatile, supporting formats such as HTML, MS Word, and MS Excel.

- Generating Reports: Under the ‘Test Reports’ section, you can select specific modules to include in your output.
- Customization: By checking various boxes, you can toggle the inclusion of failed test notes, execution duration, and individual tester comments.
- Strategic Utility: These reports provide the quantitative data necessary for release readiness reviews. A high density of "Blocked" tests, for instance, serves as a clear indicator that the testing environment requires attention before a deployment can be authorized.
Implications of Advanced TestLink Usage
Adopting the advanced features of TestLink—specifically regarding requirements traceability and granular reporting—has profound implications for software quality.

- Reduced Technical Debt: By forcing a connection between requirements and test cases, teams are less likely to miss edge cases or skip testing for newly added features.
- Audit Readiness: For industries governed by strict regulations (such as medical software or fintech), the audit logs generated by TestLink’s execution and role-management features provide a clear, indisputable record of quality assurance efforts.
- Efficiency Gains: The ability to import and export test suites significantly lowers the cost of onboarding new projects and maintaining testing infrastructure across distributed teams.
Conclusion
TestLink is an incredibly powerful, yet accessible tool that serves as a cornerstone for disciplined software testing. While we have focused on manual execution in this tutorial, it is important to recognize that TestLink is also built for the future. It supports a comprehensive API that allows for integration with modern automation frameworks like Selenium WebDriver.

By mastering the manual processes outlined here—user roles, requirement mapping, execution, and reporting—you lay the groundwork for a mature, automated testing pipeline. In our final installment of this series, we will explore how to take these concepts to the next level by automating test status updates through the TestLink API, ensuring that your manual and automated efforts are synchronized in a single, powerful dashboard.

Remember: A tool is only as effective as the process behind it. Use these features to build a culture of accountability and precision in your QA team.

For more information on setting up your environment, see the Getting Started with TestLink tutorial.