Illuminating the Future: A Comprehensive Guide to Wi-Fi-Controlled NeoPixel Installations
Introduction: The Evolution of Intelligent Lighting
In the landscape of modern electronics, few components have disrupted the DIY and professional lighting markets as profoundly as Adafruit’s NeoPixels. By integrating an RGB LED with a compact, addressable controller (the WS2811 or WS2812) into a single 5050 SMD package, Adafruit transformed the way engineers and hobbyists approach illumination. What was once a complex endeavor requiring intricate wiring and massive controller arrays has been distilled into a simple, chainable interface.
However, the hardware itself is only one half of the equation. Traditionally, NeoPixel installations have been "tethered"—either hardcoded with static animation sequences that loop indefinitely or physically connected to a PC via USB. This limitation has historically hindered the deployment of large-scale, distributed lighting systems. Today, we explore a sophisticated, decentralized approach: controlling NeoPixel installations over Wi-Fi using the Fishino Guppy and NodeMCU boards, orchestrated by a robust Python library designed for seamless integration with Windows and Raspberry Pi environments.
The Technical Foundation: How NeoPixels Work
At the core of a NeoPixel system is the ability to address individual LEDs within a chain. Each LED receives a stream of data bytes with precise timing; the first LED intercepts the first set of color data and passes the remaining signal down the line. This allows for complex, vibrant, and synchronized animations across hundreds of units.
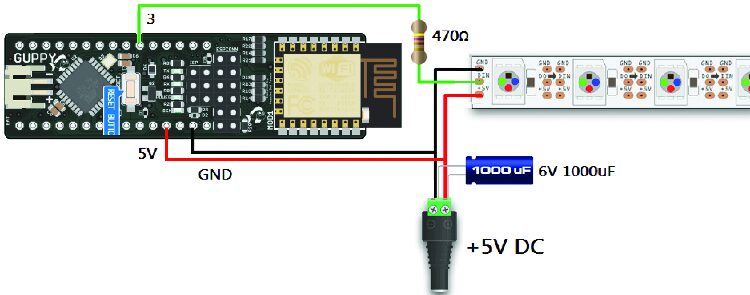
When dealing with large installations, such as a 5-meter strip containing 150 LEDs, the physical constraints become critical. A single white LED at full brightness can draw up to 60mA. Consequently, a 150-LED strip requires a robust power supply capable of delivering up to 9 amps of current. This project utilizes a 5V DC power source to ensure stability, coupled with essential protective components: a 470-ohm resistor on the data line to prevent signal noise and 1,000µF capacitors to buffer the voltage and protect the LEDs from initial power-on surges.
Chronology of Development: From Concept to Connectivity
The journey to creating a remote-controlled lighting network requires a systematic approach to hardware assembly and software configuration.
Phase 1: Hardware Preparation and Logic Translation
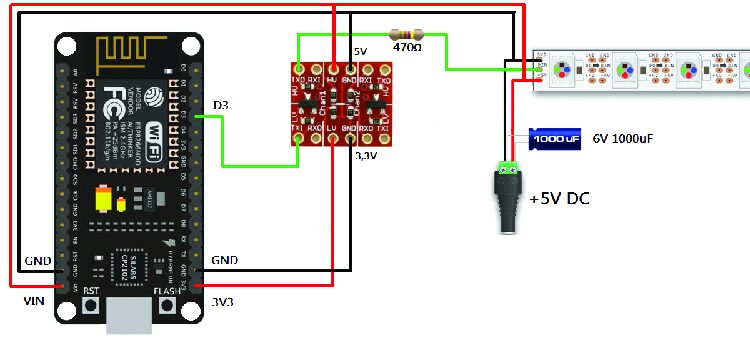
The project relies on two primary controllers: the Fishino Guppy and the NodeMCU (ESP8266). Because the NodeMCU operates on 3.3V logic, a logic level converter is mandatory when interfacing with the 5V data requirements of the NeoPixel strip.
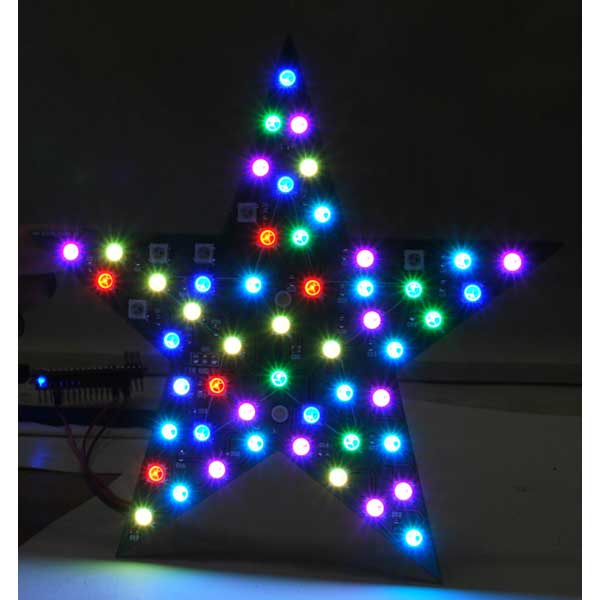
- Assembly: The Fishino Guppy is wired directly to the Christmas Star (FT1300M), while the NodeMCU is connected to the 150-LED strip through a logic level converter.
- Infrastructure: Using a 5V 50W power supply, we provide power to the LEDs and the respective microcontrollers.
- Safety: We insert the 470-ohm resistor between the data pin and the LED strip input to maintain signal integrity, a best practice for preventing flickering in long data runs.
Phase 2: Firmware and IDE Setup
The development environment is centered on the Arduino IDE, modified to support the ESP8266 ecosystem.
- Board Manager: By adding the ESP8266 package URL, we enable the IDE to compile code specifically for the NodeMCU.
- Library Integration: The Adafruit_NeoPixel library is the cornerstone of our firmware. Once installed, the provided
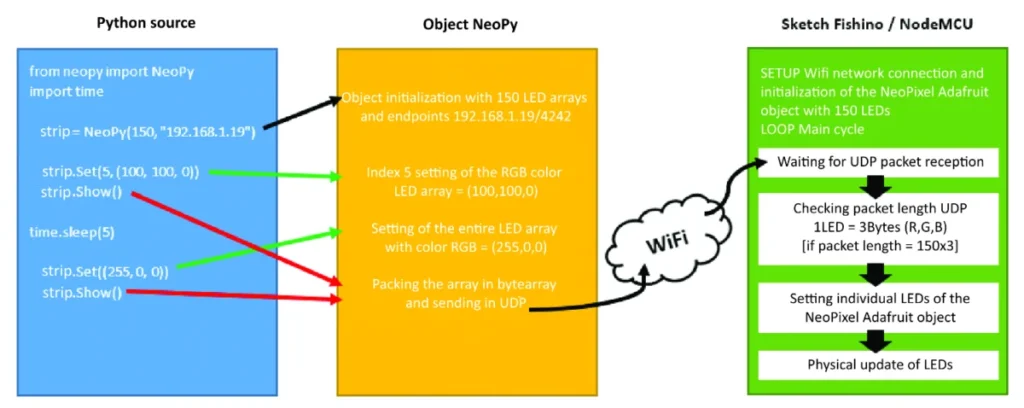
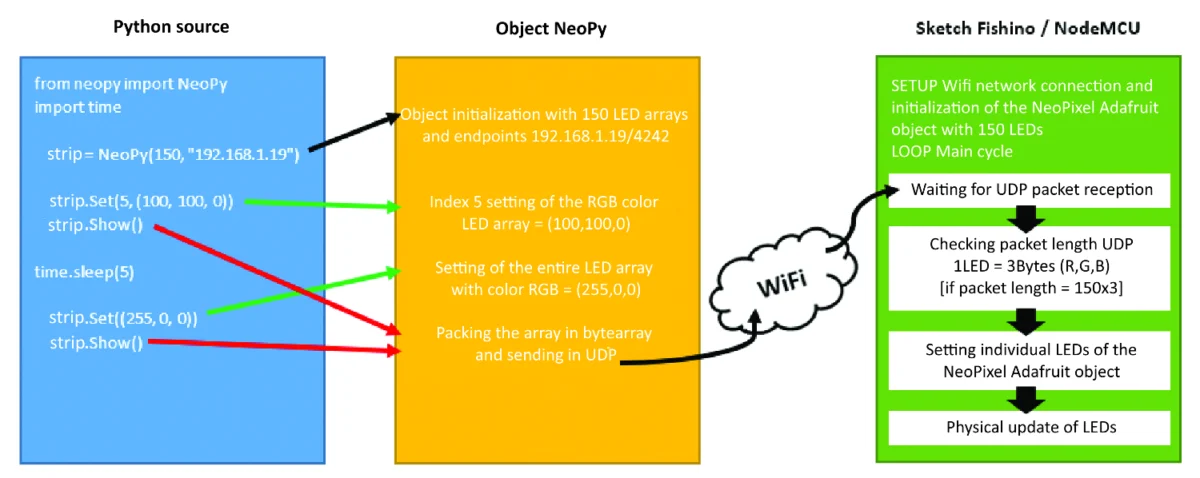
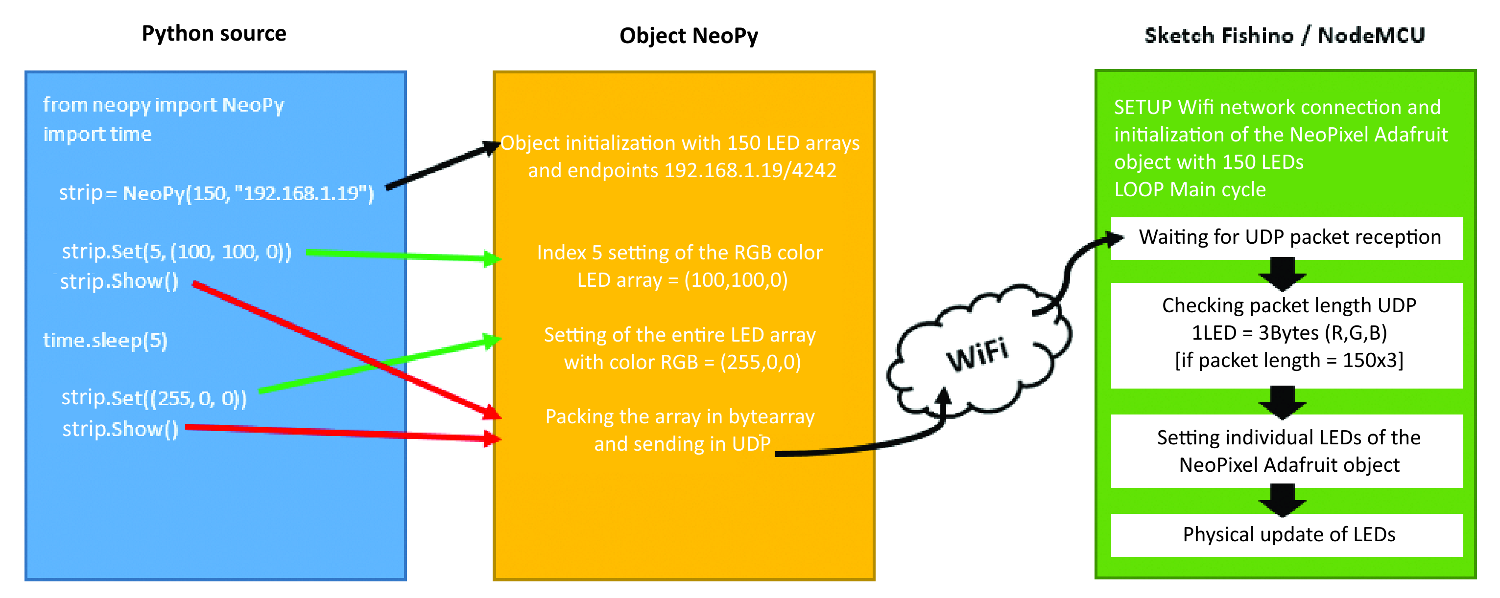
NeoPysketches are loaded onto the boards. These sketches serve as UDP servers, constantly listening for incoming color data packets over the local Wi-Fi network.
Phase 3: The Python Orchestration Layer
The project introduces the NeoPy Python library, a wrapper that simplifies network communication. Instead of sending complex serial commands, the user interacts with high-level Python objects. The Show() method, for example, packages the color array and transmits it via UDP to the target board, ensuring low-latency updates that are vital for fluid animations.
Supporting Data: Why UDP?
In selecting a communication protocol, speed is paramount. TCP (Transmission Control Protocol) offers error checking and guaranteed delivery, but the overhead of "handshaking" can introduce jitter—unacceptable for high-frequency lighting animations. We opted for UDP (User Datagram Protocol) because it treats each packet as an independent transmission. While it lacks built-in packet loss recovery, the trade-off is significantly higher throughput, allowing for the rapid color transitions required to drive smooth, professional-grade lighting effects across multiple nodes simultaneously.
Implementation: The Raspberry Pi Advantage
While a standard PC can act as the "brain" of the operation, the goal is a persistent, energy-efficient home installation. The Raspberry Pi serves as the ideal host. By installing a lightweight Linux distribution (such as Raspberry Pi OS), we can host the Python controller scripts and automate them using cron.
The Power of Automation
The crontab utility allows for the scheduling of lighting states. By editing the system’s schedule (crontab -e), users can define precise routines:
- Sunrise Simulation: Slowly ramping up brightness in a bedroom at 7:00 AM.
- Presence Simulation: Triggering randomized color changes in various rooms to create the illusion of occupancy while the home is vacant.
- Garden Lighting: Activating outdoor NeoPixel arcs at sunset, with schedules automatically adjusting throughout the year.
Implications for Modern Smart Homes
This project demonstrates that intelligent lighting does not require proprietary, closed-source ecosystems. By using open-standard hardware (ESP8266) and a flexible, cross-platform language (Python), users retain total control over their data and hardware.
Scalability
The architecture is inherently scalable. Because the NeoPy library creates an object for each controller, a single Raspberry Pi can manage dozens of disparate NeoPixel installations across a large house. Whether it is an accent strip behind a television or an artistic light sculpture in the hallway, the system treats them all as individual nodes in a unified network.
Integration Potential
The implications extend beyond simple scheduling. Because the system runs on Python, it can easily interface with external APIs. One could, for example, link the LED strip to a weather service, turning the lights blue when it rains, or connect the system to an IFTTT (If This Then That) webhook to signal incoming emails or stock price alerts. The hardware becomes a bridge between the digital data of the internet and the physical environment of the home.
Conclusion: Crafting the Future of Ambient Lighting
The intersection of Wi-Fi-enabled microcontrollers and Python-based automation represents the next step in the evolution of home ambient lighting. By moving away from static, tethered setups, we unlock a world of possibilities where lighting is dynamic, responsive, and deeply integrated into our daily routines.
For those ready to embark on this project, the resources provided in the GitHub repository—including the NeoPy library, example animation scripts, and detailed wiring schematics—provide a comprehensive roadmap. Whether you are a seasoned engineer looking to optimize your smart home or a hobbyist building your first lighting project, the synergy between Fishino, NodeMCU, and Python offers a robust, flexible, and immensely satisfying platform for creative expression.
As we look toward the future of IoT, the ability to control our surroundings with such precision—and such simplicity—marks a significant milestone in the democratization of advanced lighting technology. The only limit, ultimately, is the scope of your imagination.
Quick Start Checklist
- Hardware: Ensure you have the required resistors and level shifters to protect your LEDs.
- Environment: Set up the Arduino IDE with the appropriate board support for ESP8266 devices.
- Network: Assign static IPs to your microcontrollers to ensure the Python script can reliably reach them.
- Python: Install the latest 3.x version and ensure the
NeoPydirectory is correctly referenced in your PATH. - Automation: Use
crontabto move your scripts from manual testing to autonomous home operation.
For further technical support and hardware acquisition, visit the Open Electronics store to source the specific components utilized in this guide.