Mastering TestLink: A Comprehensive Guide to Advanced Test Management, Requirements, and Execution (Part 2)
Welcome to the second installment of our deep-dive series into TestLink, the industry-standard open-source test management tool. In our previous article, we established the foundational pillars of the platform, including system installation, the architecture of a Test Plan, and the fundamental mechanics of drafting high-quality Test Cases.

As software development lifecycles become increasingly complex, the ability to maintain traceability and streamlined execution workflows is paramount. Today, we move beyond basic setup to explore the power-user features of TestLink: sophisticated user management, robust requirements traceability, precise test execution workflows, and the strategic generation of analytical reports. By mastering these components, QA teams can significantly elevate their testing maturity and ensure that no requirement remains unverified.

The Strategic Importance of TestLink in Modern QA
TestLink is not merely a repository for test cases; it serves as a central nervous system for the Quality Assurance lifecycle. Its capability to integrate requirement mapping with execution status allows stakeholders to gain real-time visibility into project health. When implemented correctly, TestLink bridges the gap between development requirements and the final verification phase, ensuring that every line of code is held accountable to a business need.

Managing User Roles and Access Control
Security and workflow integrity begin with granular access control. TestLink provides a robust framework for user management, allowing project leads to restrict access rights based on specific roles. By default, the system includes pre-defined roles, but for organizations with complex hierarchical structures, TestLink allows the creation of custom roles with bespoke permissions.

The Workflow for User Provisioning
- Navigation: Access the administrative dashboard by selecting the "Users/Roles" link in the primary navigation bar.
- Creation: Initiate the process by selecting the "Create" button, which opens the user profile configuration form.
- Credentialing: Input the required user details, including username and system roles. Once saved, the user is registered within the TestLink environment.
- Assignment: To ensure security, navigate to the "Assign Test Project Roles" tab. Here, you can map specific users to distinct projects, ensuring that team members only interact with the data relevant to their scope of work.
- Refinement: For highly specific project requirements, utilize the "Assign Test Plan Roles" tab to further restrict or grant permissions at the granular Test Plan level.
Requirements Management: Bridging the Traceability Gap
A "Requirement" is the fundamental constraint or business need that software must satisfy. Without a formal requirement management process, test suites risk becoming disconnected from business objectives. TestLink facilitates this by allowing users to define, track, and link requirements directly to test cases.

The Lifecycle of a Requirement in TestLink
The process of managing requirements is streamlined to encourage adoption among busy QA teams:

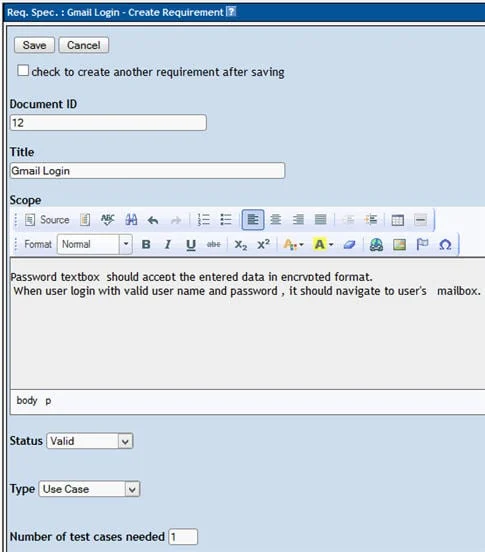
- Defining Requirements: Navigate to the "Requirements" section. After clicking "Create," you will define the Requirement Document ID, Title, and a detailed description. This metadata is crucial for audit trails and documentation compliance.
- Structuring Specification: Once the base requirement is established, the requirement specification appears in the left-hand sidebar. This hierarchical view allows for the grouping of requirements by feature set or module.
- Advanced Operations: By selecting "Requirements Operations," users can further define dependencies and relationships between requirements, creating a web of coverage that prevents scope creep and missed features.
Linking Requirements to Test Cases
The true value of TestLink lies in its "Traceability Matrix." By linking a specific requirement to a test case, you create a measurable link between a business constraint and the specific verification procedure.

- Execution: Within the "Test Specification" module, select your desired test case.
- Association: Locate the "Requirements" icon. This opens a dialogue box where you can select the relevant requirement specification and map it directly to the test case.
- Verification: Once assigned, the system updates the coverage status. This allows managers to run reports identifying exactly which requirements lack testing coverage, thereby directing QA resources to the areas of highest risk.
Executing Test Cases: The Pulse of the Release
Test execution is where the theory of design meets the reality of code. TestLink provides a dynamic interface to manage the lifecycle of a test run, moving from "Not Run" to "Passed," "Failed," or "Blocked."

The Execution Workflow
- Accessing the Panel: Navigate to "Test Execution" via the main toolbar. This opens the central hub for all active testing cycles.
- Selection: Select the relevant test suite or individual test case from the left-hand navigation tree.
- Status Updates: The execution screen provides fields to toggle the status (Pass/Fail/Blocked). It is vital to note that once a test case is updated from "Not Run," it preserves that historical data; the system does not allow a revert to "Not Run" to ensure audit integrity.
- Evidence Logging: Never execute a test without documentation. Use the "Test Execution Notes" field to document environment details, error logs, or observations that occurred during the run.
- Finalization: Clicking "Save Execution" commits the data, instantly updating the project’s aggregate statistics.
Analytical Reporting: Data-Driven Decision Making
The output of testing is not just a bug list; it is a body of data that informs release readiness. TestLink’s built-in reporting engine is a powerful tool for generating comprehensive summaries for stakeholders.

Generating Professional Reports
TestLink supports multiple export formats, including HTML, MS Word, MS Excel, and OpenOffice, ensuring that reports can be shared across diverse corporate environments.

- Report Initiation: Click "Test Reports" in the navigation bar to access the reporting dashboard.
- Content Selection: Use the check-box interface to select the specific data points required—such as test case status, requirement coverage, or individual tester performance.
- Format Configuration: Utilize the dropdown menu to choose your desired file format.
- Generation: By selecting the project folder structure, the engine aggregates the data and produces a professional-grade report ready for distribution to stakeholders or compliance auditors.
Portability: Exporting and Importing Test Suites
As organizations scale, they often need to migrate or replicate test data across different servers or project environments. The Export/Import functionality in TestLink eliminates the need for redundant data entry.

The Mechanics of Migration
- Exporting: Select the target Test Suite or Case, navigate to the settings icon, and choose "Export." The system generates an XML file containing the full structure, metadata, and requirements mapping of your tests.
- Importing: On the target system, navigate to the desired folder structure, select "Import" from the operations list, and upload the previously generated XML. The system automatically reconstructs the suite, preserving the hierarchy and logical links.
Implications and Future Outlook
The transition from manual tracking to a structured environment like TestLink carries significant implications for a team’s velocity and quality. By centralizing requirements, standardizing execution, and maintaining a historical record through exportable reports, organizations reduce their technical debt and improve their response times to critical defects.

However, manual execution is only the beginning. While this tutorial has focused on the manual capabilities of TestLink, the platform is built for integration. In the final installment of this series, we will bridge the gap between manual management and modern DevOps by exploring the TestLink API. We will demonstrate how to automate the update of execution statuses using Selenium WebDriver, effectively closing the loop between automated testing and test management.

By integrating these automated workflows, teams can eliminate the "bottleneck" of manual status entry, allowing for real-time reporting that keeps pace with the rapid speed of Continuous Integration and Continuous Deployment (CI/CD) pipelines. Stay tuned for our final guide, where we turn your test management tool into a high-performance, automated engine.