Mastering TestLink: A Comprehensive Guide to Advanced Test Management, Requirements, and Execution
Introduction
In the fast-paced world of software development, the ability to manage testing lifecycles with precision is a competitive necessity. Following our introductory exploration into the installation and basic configuration of TestLink, we now delve deeper into the platform’s core capabilities. This second installment of our tutorial series shifts focus toward the sophisticated mechanics of TestLink: managing user permissions, defining project requirements, executing complex test suites, and leveraging the platform’s reporting engines. By mastering these functions, quality assurance (QA) teams can transition from simple task tracking to robust, data-driven test management.

The Role of TestLink in Modern Quality Assurance
TestLink remains a cornerstone tool for organizations prioritizing open-source, web-based test management. Its primary value lies in its ability to bridge the gap between requirements engineering and actual test execution. By providing a centralized repository for test cases and linking them to specific project requirements, TestLink ensures that no feature goes untested. As we explore its advanced features, it becomes clear that TestLink is not merely a logging tool but a comprehensive engine for ensuring software reliability.

User Management and Role-Based Security
One of the most critical aspects of any enterprise-grade management tool is the ability to enforce granular security controls. TestLink manages this through a robust user and role-based access control (RBAC) system.

The Anatomy of Permissions
TestLink restricts access based on defined roles. By default, the system provides several tiers of access, ranging from "Guest" (read-only) to "Administrator" (full control). However, for complex organizational structures, TestLink allows for the creation of custom roles. This ensures that developers, QA engineers, project managers, and stakeholders interact only with the data necessary for their specific functions, thereby mitigating the risk of accidental data modification.

Operational Workflow for User Management
To configure your environment effectively, follow these administrative steps:

- Navigation: Access the "Users/Roles" link located on the primary navigation bar.
- Creation: Initiate the creation process by clicking the "Create" button. Input the necessary metadata, including the username, profile details, and role designation.
- Role Assignment: Navigate to the "Assign Test Project Roles" tab. Here, you must map the user to specific projects. This ensures that personnel are partitioned appropriately according to their assigned teams.
- Refinement: Utilize the "Assign Test Plan Roles" tab to further restrict access to specific test plans, ensuring a clean and organized workspace.
Bridging the Gap: Requirements Management
Requirements represent the functional and non-functional needs that a software product must satisfy. In TestLink, the Requirements module acts as the "source of truth," allowing teams to map test coverage back to specific business objectives.

Defining Requirements
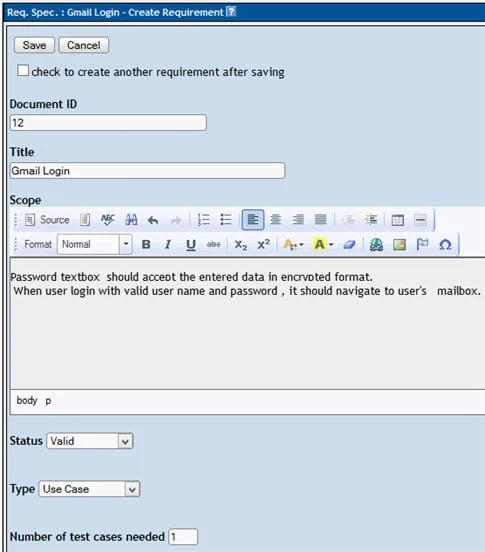
Writing a requirement in TestLink is a foundational step in ensuring traceability. Once the Requirements page is accessed via the navigation bar, users can create documentation that defines the "What" and "Why" of a feature. Each requirement should be assigned a unique Document ID, a descriptive Title, and a comprehensive Description.

Mapping Coverage
Perhaps the most powerful feature in TestLink is the ability to link a requirement directly to a test case. This is not just a bookkeeping exercise; it is an analytical tool. By assigning requirements, project leads can generate reports that identify gaps in test coverage. If a specific requirement is not linked to any test case, it serves as an immediate flag for the QA team to expand their test suite, thereby maximizing confidence in the release.

The Execution Lifecycle: From Planning to Reporting
Test execution is the heartbeat of the QA cycle. TestLink simplifies this process by providing an intuitive interface for testers to mark the status of their activities.

Executing Test Cases
When a tester enters the "Test Execution" panel, they are presented with a clear view of their assigned work. The execution status is categorized into three primary states: Passed, Failed, or Blocked. It is important to note that TestLink maintains a strict audit trail; once an execution status is updated, it cannot be reverted to the "Not Run" state. This preserves the integrity of the historical data, ensuring that reports reflect the true evolution of the testing process.

Generating Actionable Reports
Test reports provide the evidence required by stakeholders to greenlight a release. TestLink features a sophisticated reporting engine that can export data into various formats, including HTML, MS Word, and Excel.

- Customization: Users can select specific contents to include in the report, allowing for both high-level summaries for management and granular detail for developers.
- Visualization: By utilizing the folder structure, teams can generate reports on specific modules, making it easier to pinpoint exactly which areas of the software are failing.
Data Portability: Exporting and Importing Test Suites
As organizations scale, the need to move projects between environments—such as from a development server to a production server—becomes inevitable. TestLink addresses this with a seamless Export/Import feature.

The Value of Portability
The ability to export test cases into XML format eliminates the tedious need for manual re-entry when setting up new instances. This feature is particularly useful for:

- System Migration: Moving legacy projects to new infrastructure.
- Backup and Recovery: Maintaining off-site copies of test suites.
- Template Standardization: Sharing successful test suites across multiple projects.
By selecting the target test suite and choosing the "Export" operation, the entire hierarchy is preserved in a portable XML format. Importing is equally straightforward; users simply browse for the file, upload it, and watch as the entire structure is reconstructed in the new environment.

Implications for Future Automation
While this tutorial has focused on manual execution, it is vital to recognize that TestLink is designed with the future in mind. The platform provides a powerful API that acts as a bridge to automation frameworks.

The implication for modern DevOps teams is significant: by utilizing the TestLink API, developers can integrate automated test results—such as those from Selenium WebDriver—directly into the TestLink dashboard. This creates a "single pane of glass" where manual and automated results coexist, providing a holistic view of the application’s health.

Conclusion
TestLink is far more than a simple database for test cases; it is a vital component of a disciplined QA strategy. From the rigorous enforcement of user roles to the strategic mapping of requirements and the efficiency of import/export workflows, TestLink provides the structure necessary for high-velocity software delivery.

As we conclude this second part of our series, the takeaway is clear: efficiency in testing is built on the foundation of structured management. By utilizing these advanced features, teams can reduce the overhead of repetitive tasks, ensure full coverage of requirements, and provide stakeholders with the clear, evidence-based reporting required for informed decision-making.

In our final installment, we will move beyond the user interface to explore the programmatic side of TestLink, demonstrating how to automate the updating of test statuses using the API. This final step will allow you to transition your QA processes from manual interaction to a fully integrated, automated testing ecosystem.