Orchestrating Light: Building a Wi-Fi-Enabled NeoPixel Ecosystem with Python and IoT
The landscape of modern lighting has undergone a radical transformation over the past decade. Central to this evolution is the NeoPixel—a compact, addressable RGB LED package that integrates its own controller directly into the light-emitting component. Originally championed by Adafruit Industries, these versatile diodes have moved beyond simple indicator lights to become the building blocks of complex, dynamic installations. By combining the power of the ESP8266-based microcontrollers (Fishino and NodeMCU) with the flexibility of Python, we can move away from static, tethered lighting and into the realm of truly distributed, Wi-Fi-controlled illumination.
The Evolution of Addressable Lighting
NeoPixels are fundamentally different from traditional LEDs. In a conventional setup, an external controller must handle the intricate timing required to manage multiple light channels. NeoPixels, however, house an RGB SMD LED (typically the 5050 format, capable of 20 lumens) alongside a specialized driver—the WS2811 or WS2812. This architecture allows a microcontroller to send a single stream of serial data, which each pixel "reads" and acts upon, passing the remainder of the data down the line.
This addressing capability allows users to control individual colors and brightness levels within a chain of hundreds of LEDs. From wearable technology to sophisticated architectural lighting, the NeoPixel has become the standard for creators. However, the traditional approach—loading code directly onto an Arduino and relying on a hardwired USB connection—limits the scope of these projects. For residential or commercial installations, physical access for updates is rarely convenient.
Project Scope: A Distributed Lighting Network
The project detailed herein proposes a system for orchestrating multiple NeoPixel installations via Wi-Fi. By employing a Fishino Guppy and a NodeMCU (both leveraging the robust ESP8266 chipset), we can create "nodes" that exist as independent actors on a network.
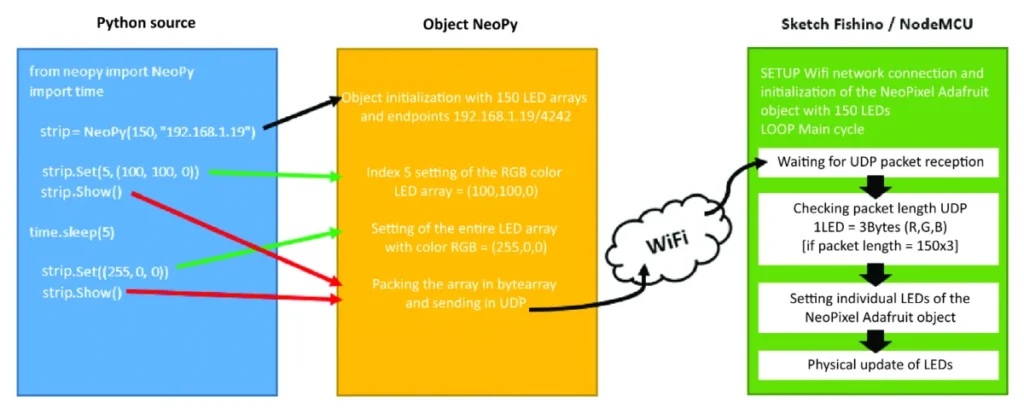
The core of this system is a custom Python library—NeoPy—which acts as the master controller. This library offloads the complexity of animation logic from the microcontrollers to a central, more powerful unit: a Windows PC or a Raspberry Pi. This separation of concerns allows for complex, multi-device sequences that can be updated in real-time without ever re-flashing a microcontroller.
Technical Specifications and Componentry
Success in this project requires a careful approach to hardware selection and electrical safety. The power requirements for addressable LEDs are significant; at full intensity (white), a single LED can draw 60mA. A 5-meter, 150-LED strip thus requires a robust 9-amp power supply.
Essential Components:
- Microcontrollers: Fishino Guppy and NodeMCU (ESP8266).
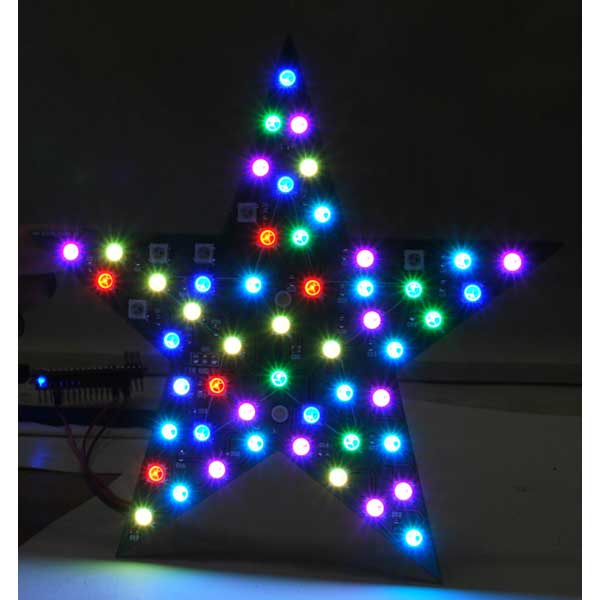
- Lighting Hardware: 5-meter WS2812B strip (300 LEDs) and a 56-LED NeoPixel star.
- Power Management: 5V 50W Switching power supply.
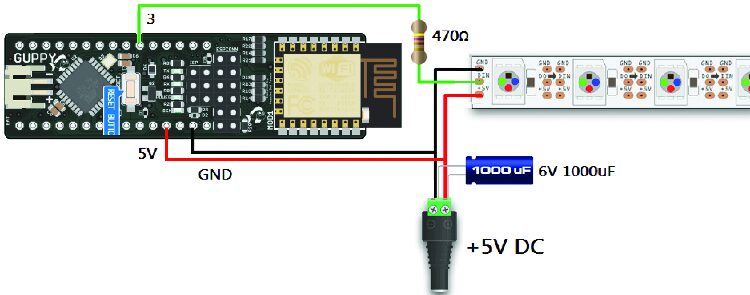
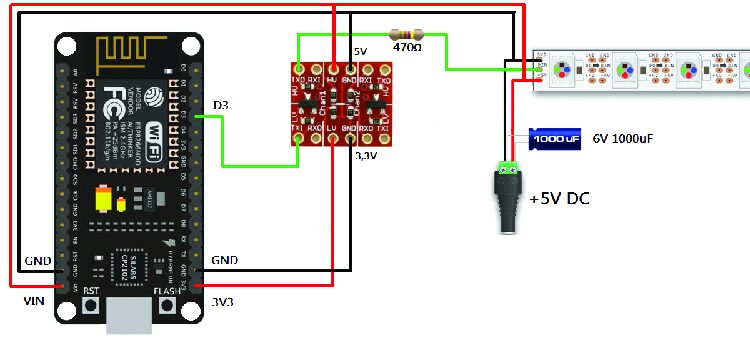
- Protection: 470-ohm resistors (to protect data lines) and 1,000µF capacitors (to smooth voltage spikes).
- Logic Level Shifting: LLCTTL 3.3V to 5V converter for the NodeMCU.
- Control Unit: Raspberry Pi for 24/7 automation.
Electrical Integrity
When designing these circuits, safety is paramount. The 1,000µF capacitor should be placed across the power rails to prevent initial inrush currents from damaging the sensitive LED drivers. Furthermore, because the NodeMCU operates on 3.3V logic while the NeoPixel strip requires 5V, a logic level converter is mandatory to ensure reliable signal transmission. The 470-ohm resistor serves as an impedance matcher, preventing signal reflection that could cause flickering or "glitching" in the first pixel of the chain.
Chronology of Setup and Configuration
Establishing this network requires a systematic approach to both firmware and software configuration.
- Environment Preparation: Use the Arduino IDE with the ESP8266 board manager package. Ensure that the Fishino libraries are up to date and compatible with the current firmware version.
- Firmware Deployment: The "NeoPy" sketches, available on the project’s GitHub repository, must be configured with specific Wi-Fi credentials and static IP addresses for each device. This ensures that the Python controller can reliably find its targets on the local area network.
- Library Implementation: The Adafruit NeoPixel library is the foundation. By importing this into the IDE, the microcontrollers gain the ability to parse UDP packets.
- Network Logic: The microcontrollers run a UDP server. We favor UDP over TCP in this application because of its speed; since lighting effects require low-latency updates, the overhead of TCP’s handshaking would result in jerky animations.
Python: The Software Control Layer
Python was selected for this project due to its readability and cross-platform compatibility. The NeoPy library provides a clean interface for interaction.
Set(N, (R, G, B)): Targets a specific LED.SetAll((R, G, B)): Applies a uniform color to the entire array.SetBrightness(L): Adjusts the global intensity.Wheel(V): A color-cycling helper function.Show(): The final method that pushes the buffer to the hardware via UDP.
The flexibility of this library allows for sophisticated scripts. One can define an object for a "Bedroom Strip" and another for a "Living Room Star," then manipulate them independently or in unison from a single script.
Implications for Smart Home Integration
By transitioning the control logic to a Raspberry Pi, the system becomes a viable smart-home automation tool. Using the Linux crontab utility, we can schedule complex lighting behaviors based on the time of day or other environmental triggers.
The Power of Automation
- Circadian Lighting: Simulate a sunrise in the bedroom by gradually increasing the brightness and shifting the color temperature of an LED strip over a 30-minute period.
- Security Simulations: If the home is vacant, randomizing lighting patterns in different rooms can create the impression of occupancy.
- Sensor-Driven Response: Because the Python controller is running on a Raspberry Pi, it can easily interface with motion sensors or ambient light sensors, allowing the LEDs to react to real-world data.
Conclusion and Future Outlook
The marriage of low-cost ESP8266 hardware and high-level Python scripting represents a paradigm shift for DIY electronics. By decoupling the animation code from the hardware, users can create dynamic, multi-node installations that are easily modified and scaled.
This project demonstrates that sophisticated IoT lighting does not require expensive, proprietary systems. With a Raspberry Pi, a few microcontrollers, and a well-structured Python codebase, the user gains complete control over their home’s visual environment. As these technologies continue to mature, we can expect to see even tighter integration with broader home automation ecosystems, further blurring the lines between decorative lighting and intelligent infrastructure.
For those looking to expand, the next logical step involves integrating MQTT protocols for even more robust communication or exploring web-based interfaces that allow for smartphone-based control of the lighting network. The infrastructure is in place; the only limit is the creativity of the programmer.