Mastering TestLink: Advanced Test Management, Execution, and Reporting Strategies (Part 2)
Introduction and Overview of TestLink’s Advanced Ecosystem
As software engineering methodologies evolve toward continuous integration, rapid deployment, and rigorous quality assurance, the demand for structured, transparent, and scalable test management tools has never been higher. Following the foundational principles established in Part 1 of our "Learning TestLink Test Management Tool" series—which covered initial installation, system configuration, test plan formulation, and rudimentary test case creation—Part 2 dives deeper into the operational mechanics that transform TestLink from a basic repository into an enterprise-grade quality management hub.

Modern testing teams are no longer judged solely on the volume of test cases they execute, but on test coverage traceability, precise user permission structures, efficient cross-environment migrations, and comprehensive reporting mechanisms. This installment provides a detailed, step-by-step blueprint for unlocking TestLink’s advanced capabilities. By mastering user access controls, requirements management, execution workflows, report generation, and XML-based data migration, QA leads and engineers can significantly optimize their validation lifecycles.

User Access Control and Role Management in TestLink
Enterprise software testing requires strict governance to ensure that test assets—such as test specifications, execution metrics, and baseline requirements—are modified only by authorized personnel. TestLink addresses this challenge through a robust, role-based access control (RBAC) architecture. By default, the platform comes pre-configured with a variety of standard operational roles. However, administrators retain the flexibility to craft custom user roles tailored to specific organizational workflows, granting granular permissions down to individual project modules.

Step-by-Step User Provisioning and Role Assignment
To maintain operational security and accountability, organizations must carefully provision users and assign them appropriate boundaries within TestLink. The process is executed through the following structured workflow:

- Accessing the User Administration Console: Navigate to the main TestLink navigation bar and select the Users/Roles link. This redirects the administrator to the centralized user management dashboard.
- Initiating User Creation: Locate and click the Create button to open the user registration form.
- Entering Credentials and Details: Populate the required fields, including the unique username, personal details, contact information, and the baseline user role. Finalize this step by selecting the Save button.
- Assigning Project-Level Permissions: To tie the newly created user to a specific testing initiative, switch to the Assign Test Project Roles tab.
- Mapping Projects to Roles: Select the desired Test Project from the drop-down menu and pair it with the appropriate permission profile.
Administrators can similarly navigate to the Assign Test Plan Roles tab to fine-tune access boundaries at the individual Test Plan level, ensuring that testers, developers, and stakeholders only interact with the data relevant to their specific responsibilities.

Requirements Management: Bridging the Gap Between Design and Testing
A software requirement represents a specific constraint, functional need, or performance threshold that the application under test (AUT) must satisfy. In professional quality assurance, disconnected testing—where test cases bear no formal relationship to product requirements—frequently results in critical gaps in test coverage. TestLink integrates requirements management directly into the test lifecycle, allowing teams to define, specify, and track requirements alongside their test suites.

Authoring and Specifying Requirements
Establishing a clean requirements hierarchy within TestLink ensures absolute traceability from initial product conception to final execution. Follow these steps to log requirements:

- Navigating the Requirements Module: Click on the Requirements link in the global navigation bar to open the requirements management interface.
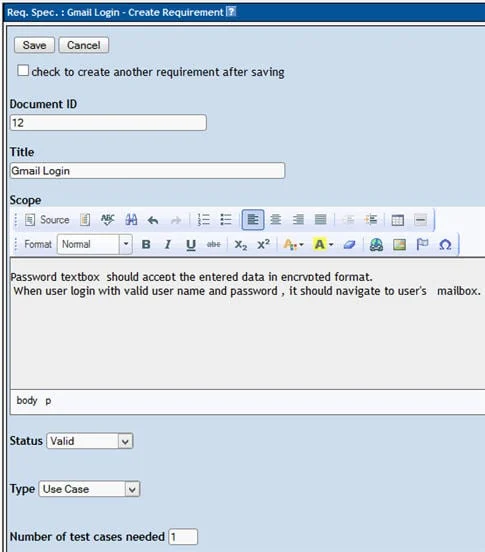
- Creating a New Requirement Document: Click the Create button. Enter the specific Document ID, an unambiguous Title, and a comprehensive Description of the requirement, then click Save.
- Defining Requirement Specifications: Once established, the requirement specification will populate on the left-side navigation panel.
- Executing Requirement Operations: Click the Create button within the Requirements Operations submenu, complete the detailed parameter fields, and save the record.
Linking Requirements to Test Cases for Maximum Test Coverage
Once requirements are logged, they must be linked to corresponding test cases. This linkage provides critical visibility during reporting phases, highlighting orphaned requirements that lack adequate test coverage.

- Step 1: Access the Test Specification section and select the target test case.
- Step 2: Click the Requirements icon embedded within the test case toolbar to launch the requirements mapping dialog.
- Step 3: Choose the correct requirement specification from the drop-down menu and check the boxes next to the relevant requirements.
- Step 4: Click the Assign button. The chosen requirements will now appear in the assigned requirements section, officially binding the business or functional need to its verification procedure.
Executing Test Cases and Managing Execution Statuses
Test execution is where planning meets reality. TestLink facilitates systematic test execution while maintaining a strict audit trail of results. Every test case begins its lifecycle in a "Not Run" state. Once a tester interacts with a test case and records an outcome, the status transitions to "Passed", "Failed" or "Blocked". Notably, to preserve data integrity and prevent audit tampering, TestLink does not permit users to revert an executed test case back to the "Not Run" status once an outcome has been saved.

The Test Execution Workflow
To execute test cases and document results accurately within TestLink, follow these procedures:

- Navigating to the Test Execution Panel: Click the Test Execution link on the top navigation bar.
- Selecting the Target Test Case: Use the left-side project tree panel to locate and select the specific test case or test suite you wish to run.
- Recording Execution Outcomes: Choose the appropriate status—Pass, Fail, or Blocked—and input comprehensive execution notes, error logs, or environment details in the text area provided.
- Saving the Record: Click the Save execution button. TestLink immediately logs the timestamp, tester identity, and outcome, updating the global metrics for the active Test Plan.
Generating Comprehensive Test Reports
Stakeholders, project managers, and clients rely on quantifiable metrics to gauge release readiness. TestLink includes a powerful, built-in reporting engine capable of aggregating test execution data, defect counts, and requirement coverage metrics into professional-grade documents.

Report Generation Options and Formats
TestLink supports exporting reports in multiple formats, including HTML, Microsoft Word (DOC), Microsoft Excel (XLS), OpenOffice Writer, and OpenOffice Calc.

- Accessing the Reporting Dashboard: Click on the Test Reports link in the navigation bar.
- Selecting Report Types: Choose the specific report template (such as the general Test Report or Test Plan Report) from the left-side panel.
- Customizing Report Contents: Use the check-boxes to select the precise data points, metrics, charts, and summaries to include in the output.
- Formatting and Exporting: Select your preferred file format from the highlighted drop-down menu, then click on the target Test Project folder structure in the right-side panel to compile and download the document.
Exporting and Importing Test Cases and Test Suites
In enterprise environments, infrastructure migrations, server upgrades, and multi-team collaborations often require moving test assets between different TestLink instances. Re-authoring entire test suites manually introduces human error and consumes valuable engineering hours. TestLink solves this via its robust XML-based Export and Import utilities.

Exporting Test Assets
- Selecting the Asset: Navigate to the Test Specification page and select the test case or test suite you wish to archive or migrate.
- Accessing Operations: Click the settings icon on the right-side panel to reveal available test case operations.
- Executing the Export: Click the Export button, ensure all verification checkboxes are selected, and confirm the export. TestLink packages the assets into a standardized XML file and downloads it to your local drive.
Importing Test Assets
- Targeting the Destination: Select the destination test suite folder within the project tree where the imported items should reside.
- Initiating the Import: Click the settings icon and select the Import button from the operations list.
- Uploading the XML File: Browse your local drive to attach the previously exported XML file, and click Upload File. The imported test cases and suites will instantly populate within the designated project hierarchy.
Conclusion and Looking Ahead
This comprehensive breakdown of TestLink’s advanced feature set demonstrates its capability as a flexible, open-source test management solution. From maintaining rigorous role-based access controls and linking test cases to functional requirements, to executing tests and generating multi-format stakeholder reports, TestLink equips QA teams with the tools necessary to ensure high software quality.

However, manual test execution and reporting represent only part of the modern testing equation. In the next and final installment of this series, we will bridge manual test management with automated continuous integration by exploring advanced concepts—specifically, updating test execution statuses remotely via Selenium WebDriver code utilizing the TestLink API. Automating these repetitive administrative tasks eliminates friction between automated test suites and manual tracking repositories, saving engineering teams countless hours across the software development lifecycle.